![]()

Greetings and salutations to one and all! First and foremost, Happy New Year!
It's the start of a new year and I hope that this year will be a lot better then the last year. I also hope that everyone has a lot of building planned for the new year as well.
Since our last newsletter, we are still discussing the options as to when we can have our own show. Monday's meeting (1/18/21) is canceled and just keep tabs on our club emails and the Sprue and Glue News for any additional updates.
Two more things - if you have not paid your dues, please pay up and send the dues to:
Tom Faith
7381 Clinton St.
Elma, NY 14059
Make checks payable to IPMS Niagara Frontier. Larry has also sent out an email with this information.
Lastly, I have heard through friends in the know that Squadron mail order is going out of business. Before the holidays, they were ramping up discounted sales as they were going to be closed for renovations. But as of this past Monday, they will close for good. What a way to start the year off, huh?
Until next time, happy modeling!
Michael Butry
President
IPMS Niagara Frontier

IPMS Niagara Frontier Meeting Agenda - January 18, 2021 - NO MEETING.

We would like to encourage all club members to join the national IPMS. Help support your hobby on a national level. IPMS provides the insurance that allows us to have our events, and membership includes a nice monthly magazine. The website can be found at: IPMS, and an application form can be found HERE.
Unfortunately, due to revised Covid guidelines caused by recent increases in infection cases, the general club meeting for this coming Monday, January 18th, has been cancelled. If you know anyone that was planning to attend and doesn't get our emails or see the website or FaceBook page, please pass the word.
Club dues for 2021 are now due. The Eboard realizes that club activities have been greatly reduced due to
the pandemic, but the club still needs revenue to cover expenses. We have been fortunate that our club
meeting facility, the Knights Hall, has not been charging us for the months that we've been unable to hold
general meetings, but that will change as soon as meetings can be held again. Also, the club was not able
to have our annual BuffCon show, a major source of income, last year, and there is a real chance that we
may not be able to hold a BuffCon in 2021. If you can afford to pay the annual dues of $20 and help support
the club during difficult times, please send a check to:
Tom Faith
7381 Clinton St.
Elma, NY 14059
Make checks payable to IPMS Niagara Frontier. Thank you!
Recently, a member of our club informed me of a good deed that deserves some recognition. This member went through some difficult times that required him to give away his model collection due to personal circumstances. He was overjoyed to have his models returned to him, unexpectedly, by another club member who had saved them. The member who returned the models wishes to remain anonymous, but this is a great example of club members acting as friends and helping each other out.
The December 2020 newsletter of the IPMS Patriot chapter is available HERE.
The Links page on the club website has recently been updated with information contributed by members. If you have a favorite website for modeling info, forums, etc., email the information to larryo@ipmsniagarafrontier.com.
A NOTE TO NON-MEMBERS
IPMS Niagara Frontier is a group of people from the Western New York area who enjoy the hobby of scale model building. We have about 80 members with 40+ attending each monthly meeting. Our club meets at 7:00pm on the third Monday of every month at The Knights, 2375 Union Rd., Cheektowaga, NY 14225.
A typical meeting starts with a short session related to club business. This is followed by "Show & Tell" - many members bring in their current work in progress to share experiences with other members. There is usually at least one model-related demonstration by a club member at each meeting. Meetings are free to the public. If you are in the Western New York area we would love to have you drop in to one of our meetings and say hello. We welcome modelers of all skill levels - from beginner to expert.
Our annual BuffCon event held each year in April continues to be one of the largest shows in this part of the country.
As a community-oriented club we also gather toys each Christmas for the "Toys-for-Tots" program and are proud of our support of this worthwhile program.
A brochure that describes the club and its activities can be found HERE.

The December 2020 general meeting was cancelled, so there are no minutes.

To promote greater transparency regarding the operation of the club and the EBoard, action items from the previous month's EBoard meeting will be published in the newsletter. These will not be detailed minutes of the meetings, but highlights that the general membership should be aware of.
A Zoom meeting was organized by Larry O. and held on December 14th, but not enough Eboard members were able to participate to have a quorum, so no official meeting was held. There was a general discussion on the state of the world, the club, and our shows, with a general consensus of "wait and see what happens before making any commitments".

Unfortunately, we've run out of material for member profiles, and haven't been able to get photos due to meeting cancellations. We'll get back on track when meetings start up again.

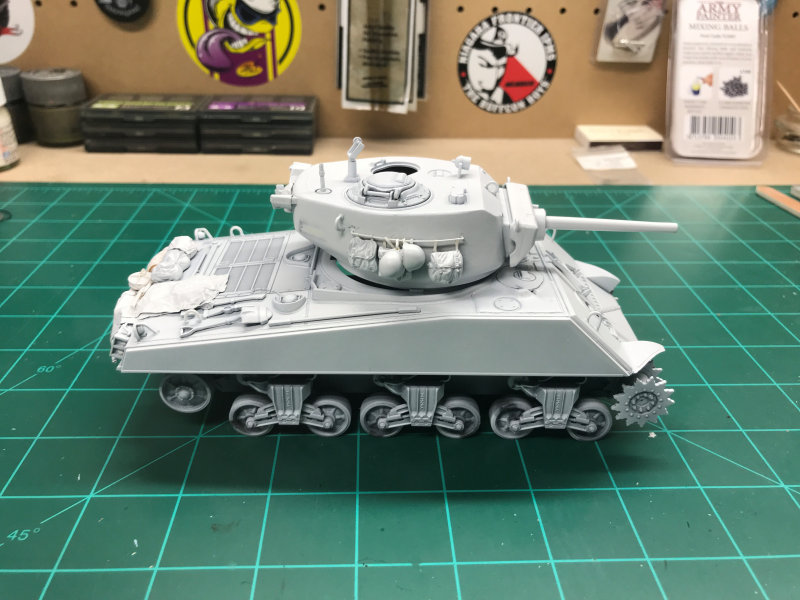
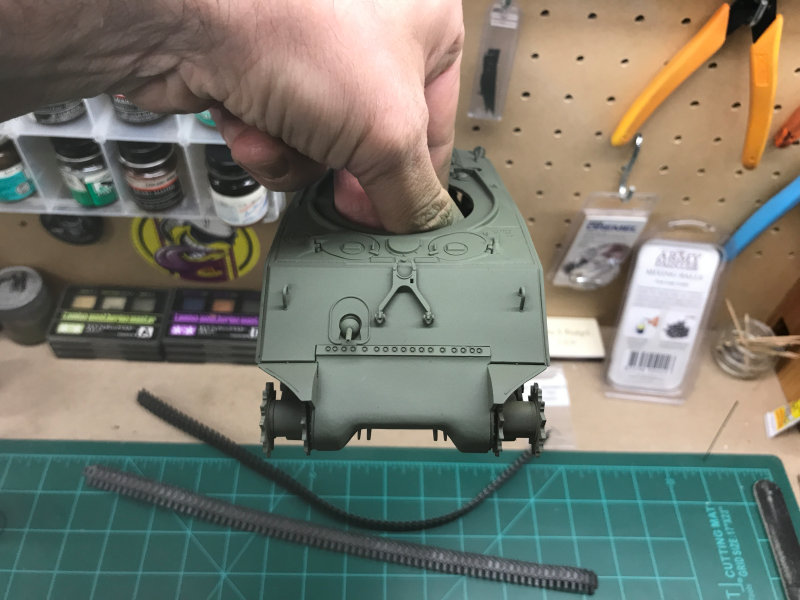
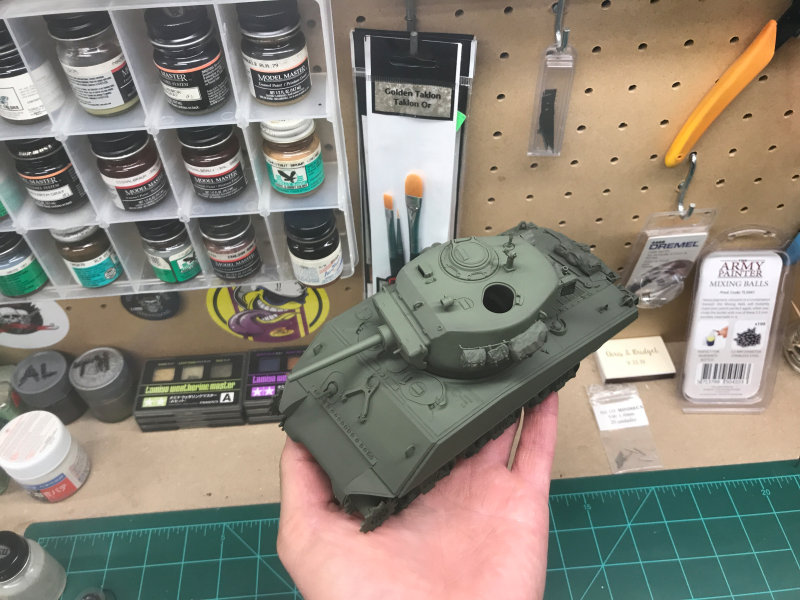
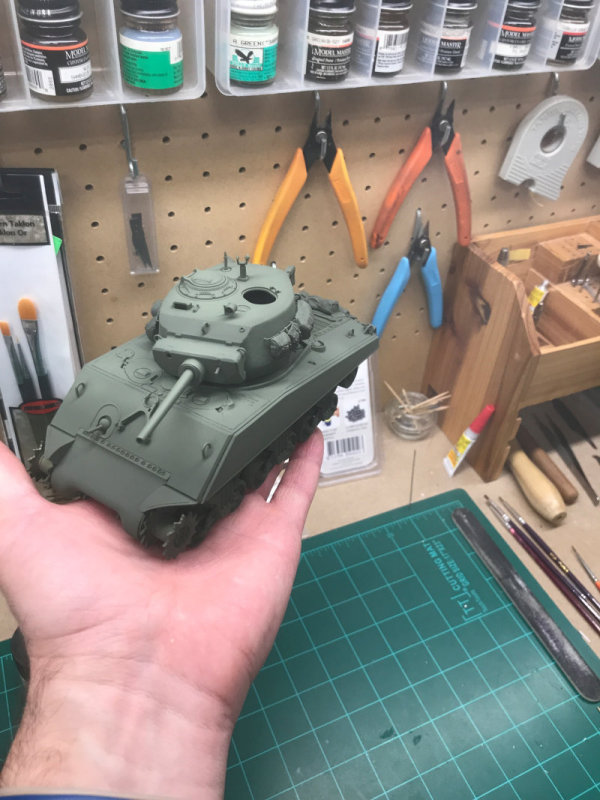
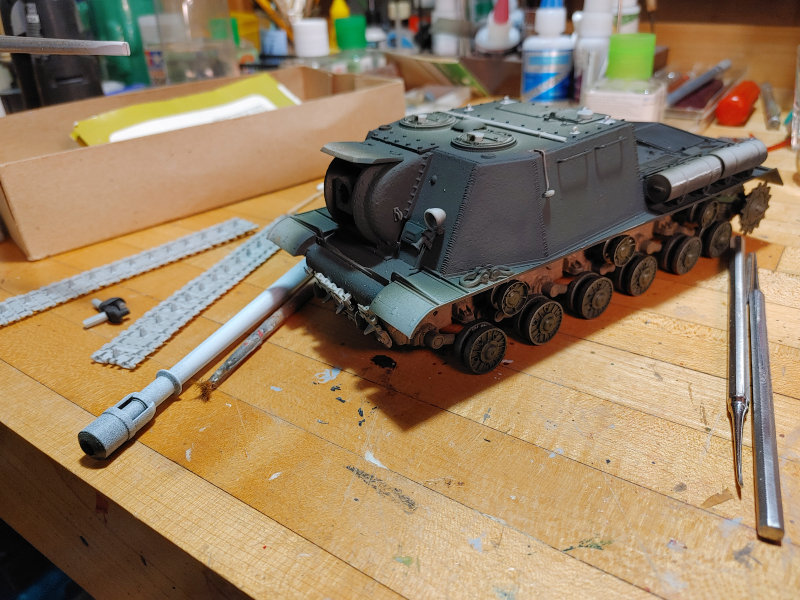
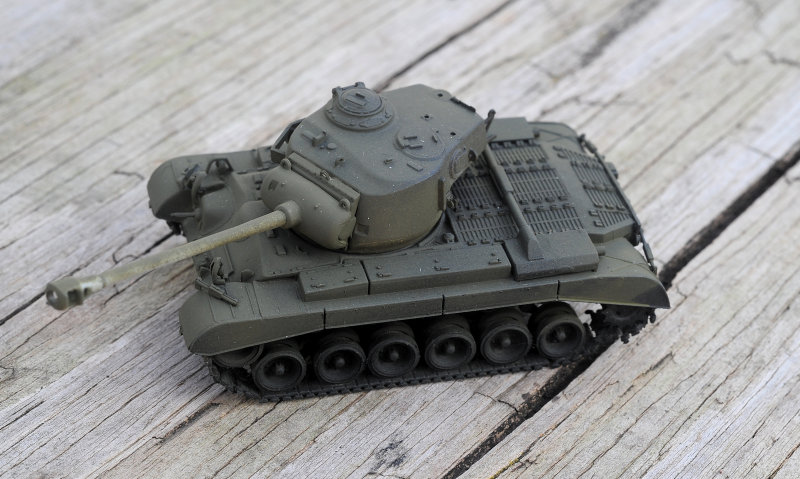
The Start Of a Snow Sherman, Part 2
by Mike Butry
This segment, I'm going to concentrate on priming the tank, base coating it and applying the final coat.
Here's what I used:
As I mentioned in the last newsletter, I permanently glued the tarps, bags and any other gear to the kit so it would be easier for me to paint/detail later.
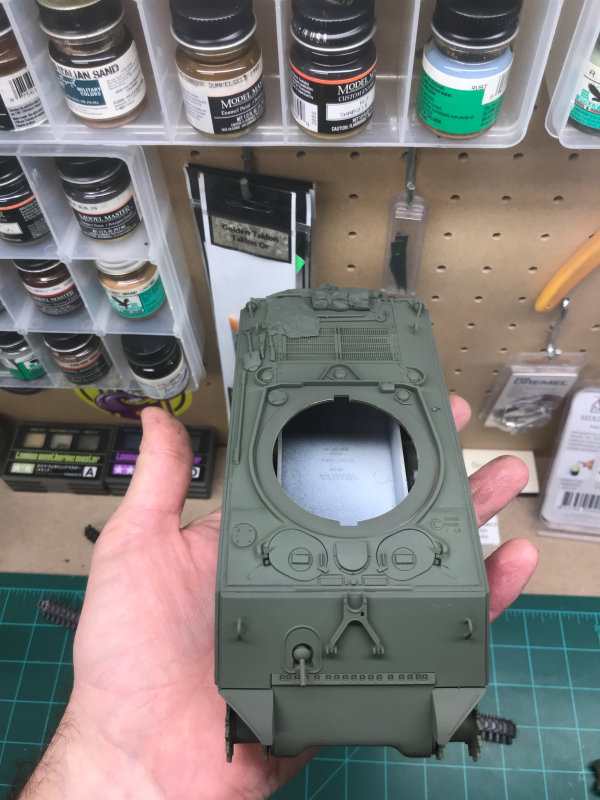
I started off priming the turret, and any teeny tiny blemishes have all disappeared. I did three light coats of Tamiya's primer which really works nicely. I continued applying the primer to the hull and again, I applied three light coats.
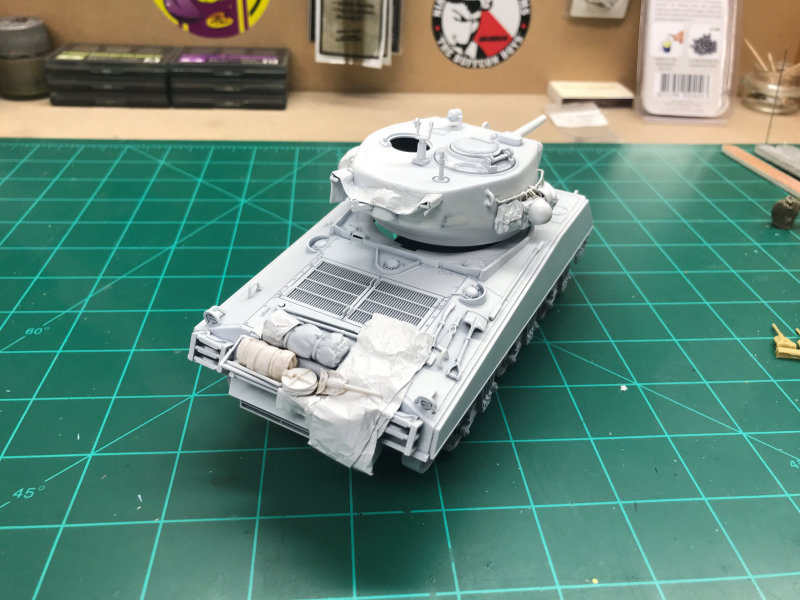
Happy with the results, I began to apply my base coat after letting the model sit for a few days so that
the primer was fully dry. Usually when I apply the base coat, I use flat black but with this build, I wanted
to be a little different. So I decided on Tamiya's dark green. I thinned out the paint with Tamiya's thinner
50/50 and started painting. I built up the paint with about 4-5 light coats.
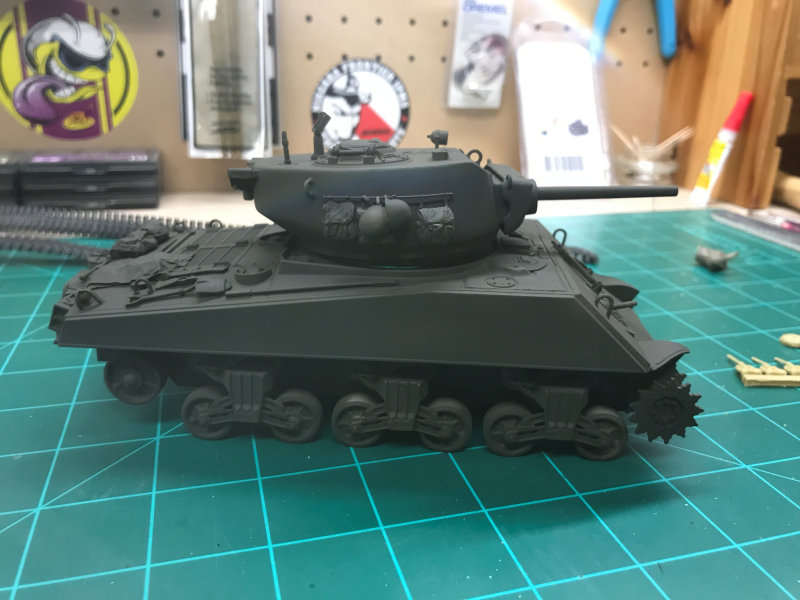
I know that the Sherman is painted in some form of olive drab green but Tamiya's field grey stood out to
me. Yes, even though this is a grey color, once applied, the hue is very close to a faded green. Prior to
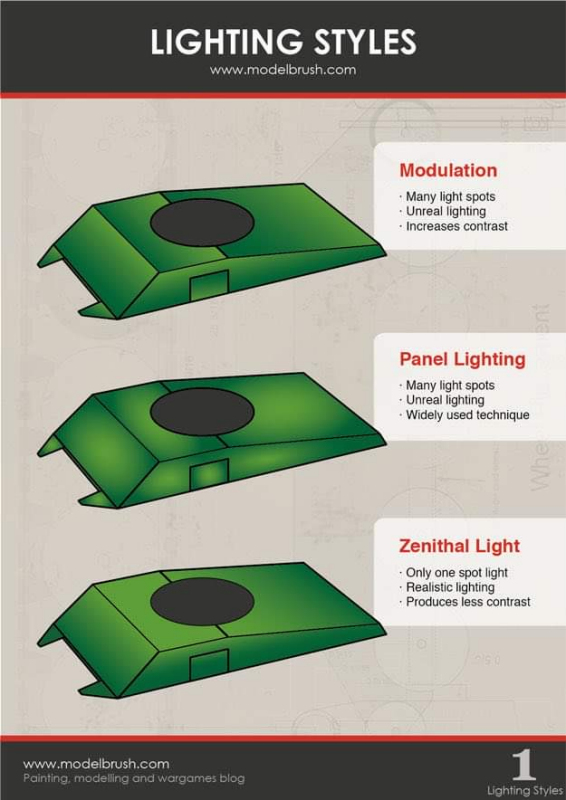
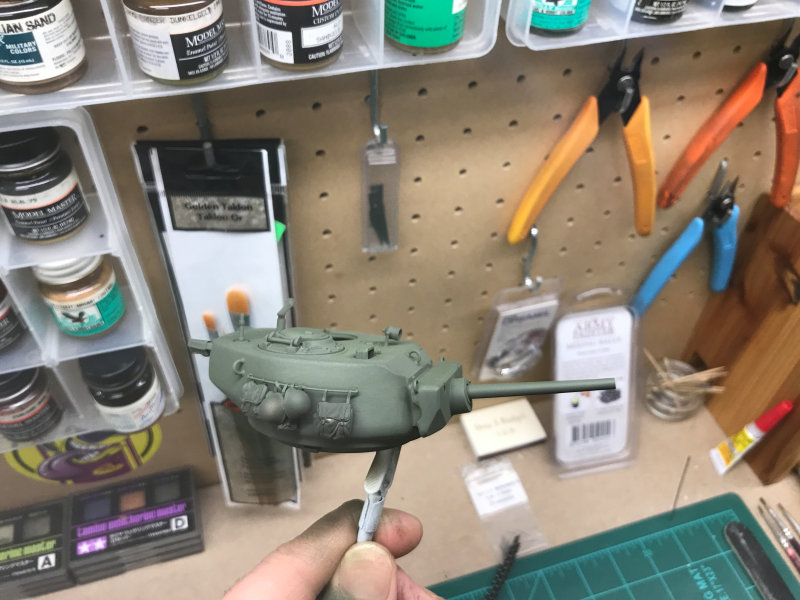
applying the main color, I was chatting with a fellow modeler friend out of North Carolina about colors and
shading. So he passed on this page from one of his Mig modeling "how to" magazines. It's titled "Lighting
Styles", and it explains how lighting effects objects and such. The last diagram is called zenithal lighting
which is the most accurate and it shows how light is projected on a particular subject.
With that being said, I started off about 6" away from the build and as I worked my way up to the top of
the hull, I got closer with the airbrush. I did this a few times until I got the shade I was looking for.
Then I took Tamiya's buff and subtly added it to my original field grey mix to get that faded/olivey tone that
I wanted. Repeating the steps, I started at the bottom at roughly 6" away and as I moved up the hull, I moved
in closer with the airbrush. But with this part of spraying, I concentrated the light towards the center of
where the turret sits.
I used the same method with the turret and when everything was done, I really liked how this effect
looked on the build and as you draw your eye from the bottom to the top, the color went from dark to
lighter tone. Essentially how natural lighting would work. This is all new to me and I've done a lot of
experiments/methods, but so far this latest method ain't too shabby.
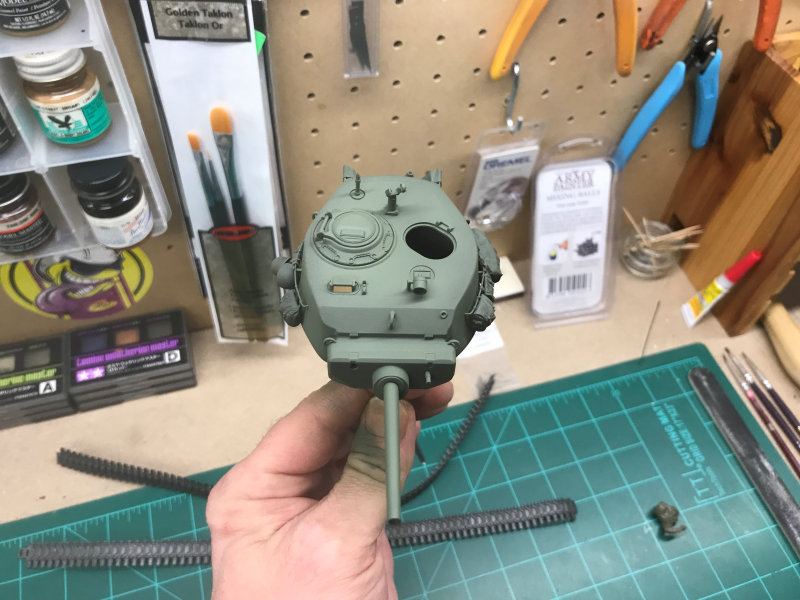
So in the next newsletter, I'll be adding color to the tarps and other details along with some
weathering and even a snow wash, so stay tuned!
Happy modeling!
Mike Butry
My Projects For the January Sprue and Glue News
by Dick Schulenberg
Some of you know that my brother Roger is a model railroader from birth. He's much more focussed
than me and has been working on his HO (1/87) scale layout for over 40 years. It began as a Western
New York themed shortline in the year 1949, the year he was born, and kept that theme since then.
Many of the scratch built structures are models of real structures existing in the Dunkirk-Fredonia
area in 1949. Here's a link to a professionally done rail height tour of the Niobe & French Creek
Railroad in 1949.
Roger Schulenberg's Niobe & French Creek RR
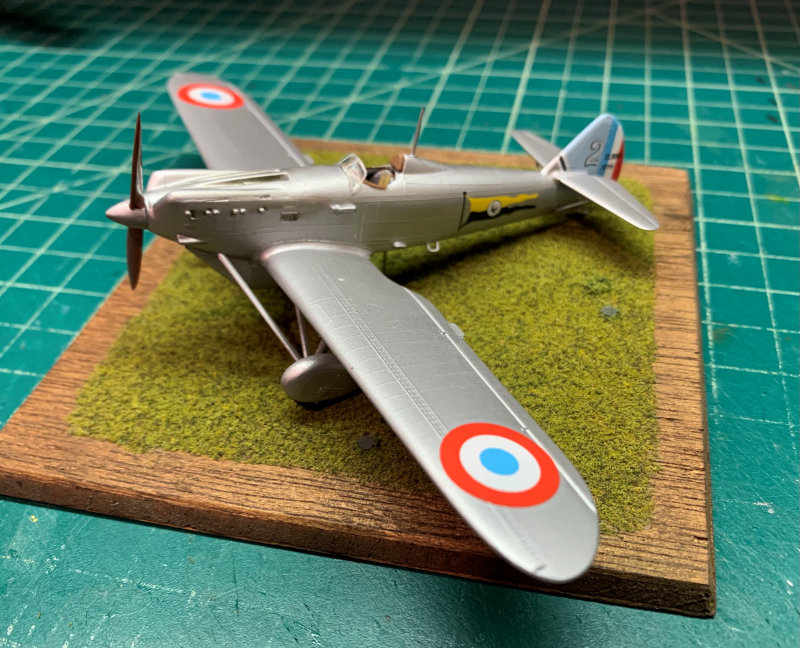
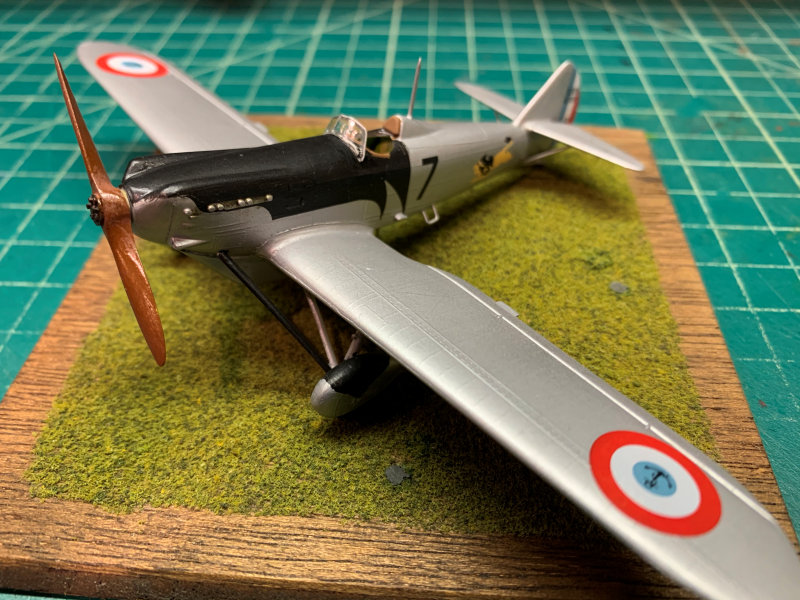
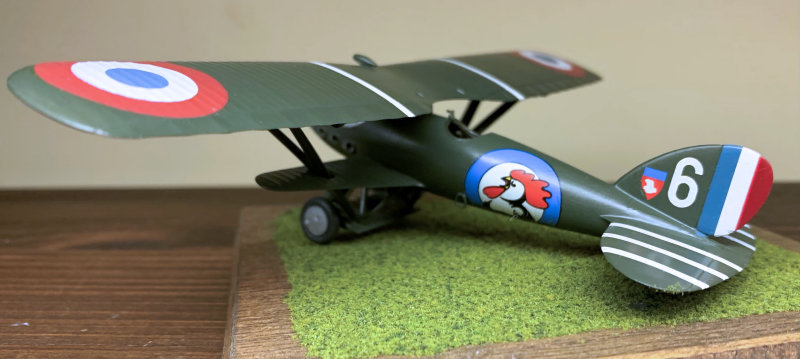
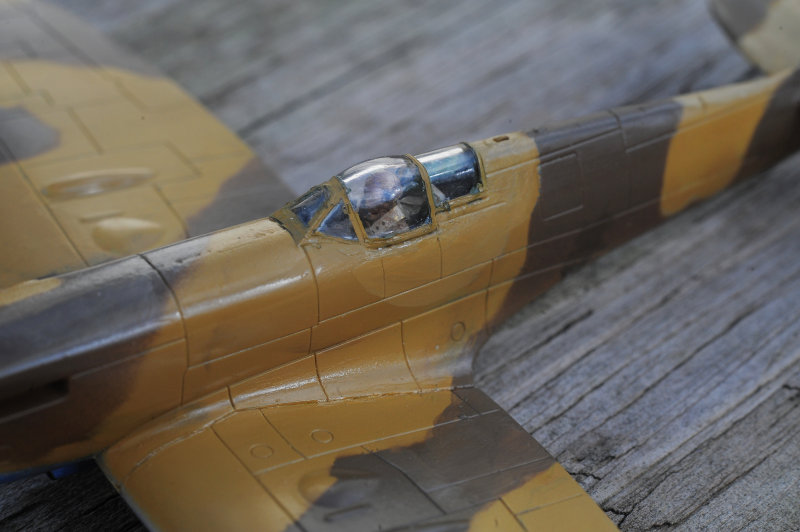
I'm still in my French period. I finished up the three 1/72 mid-'30's Dewoitine fighters and am
pretty happy with them. They are all from late '70's Heller molds and went together without incident.
Very little filler was needed. I lightly sanded the raised surface details to reduce them a bit but
otherwise left them as is to add some interest. Decals for all are by Printscale. They worked well but
need a lot of water under them to keep them from grabbing as soon as they touched down. The blue
tailed #2 is a D.500, the black cowled #7 is an Aeronavale D.501, and the camouflaged one with the
skeleton on the side is a D.510. The D.500 and 501 are painted with Tamiya spray can Silver Leaf and
overstated with Vallejo Satin since the planes were painted aluminum and look dull in photos. I just
couldn't go for a dead flat finish.

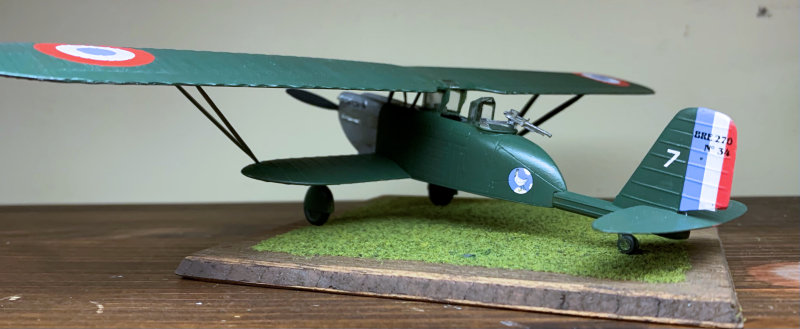
I also finished up the homely Azur Breguet 27 French Army cooperation plane. It was fiddly, but
generally went together OK. I got stalled in it for a month because I scratched the vacuformed
windscreen and got discouraged. The big top wing sits on the windscreen and two separate struts in
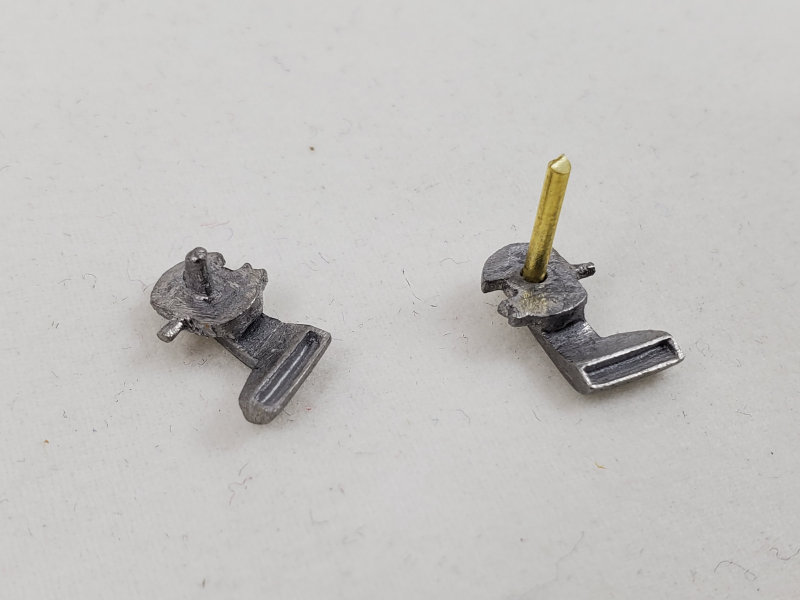
front, with no positive positioning for anything. I finally decided to fit a .032" brass post into
mating holes in the wing and fuselage at the front of the windscreen. I worked out the wing location
by enlarging the side view in the decal placement diagram to match the length of the as-built
fuselage. Once that post was in, I trimmed the height of the glued on windscreen until the wing sat
flat and the struts fit. No fun. The windscreen didn't tolerate trimming well and needed to be
superglued back in place numerous times. The good thing was that the scratch in the windscreen was
now sanded away, but the superglue fogged the clear plastic. At least the windscreen is mostly
hidden under the wing. No aftermarket for this kit, so good thing the kit decals still worked.
This one is a back row model, but it's done.
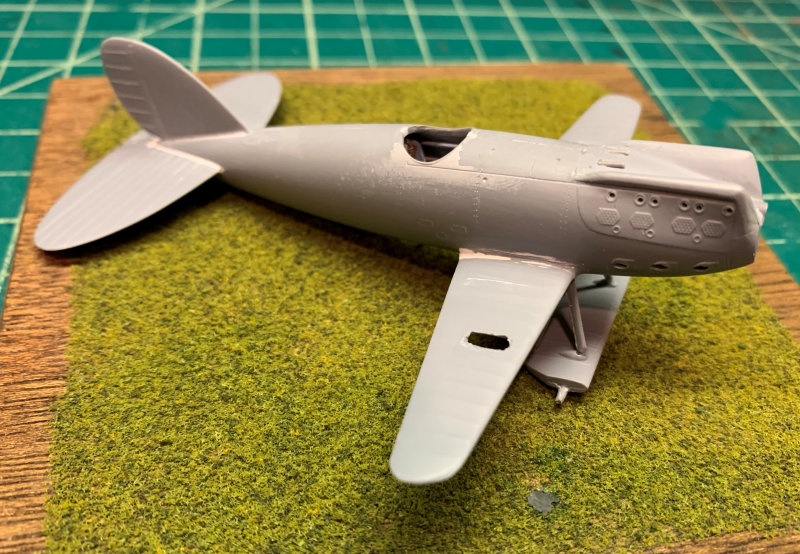
As a companion piece, I started an Azur Nieuport-Delage NiD-622 fighter. I built the Heller
version a long time ago and thought this would be a nice upgrade. It's a little more detailed and
isn't covered in rivets, but suffers from mold shift on the struts that leaves them spindly if you
completely clean them up. I didn't. Honestly, except for decals, I think the old Heller kit is a
better build and accurate enough for me. The finished model is the Heller kit.
I started on a 1/72 MPM Grumman F5F-1 Skyrocket a while ago and quit when I lost the wheels.
I finally pawed through my scrap box and came up with some wheels that will work. They may be from
a P-40 kit. Restarting, I decided the model needed to be mostly stripped and repainted. That's
done so it's time for decals and I can install the canopy once the clear coat dries.

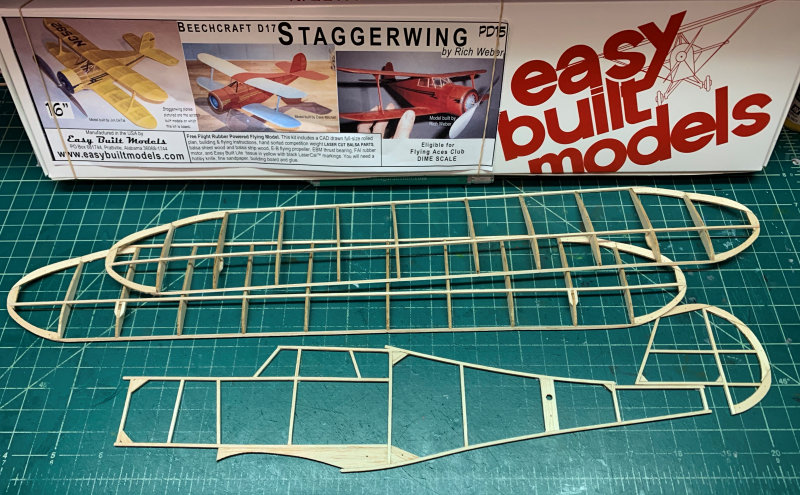
Since I don't already have enough started models going, I decided to do something different
that I've been thinking about for literally years. My earliest modeling memories are of Aurora
plastic kits and Comet tissue covered stick and and tissue rubber powered flying models. I've
collected more than a few stick built kits and decided this is time to build one. It's all spurred
on by meeting a man at our local Burger King who was showing one of the girls who work there his
latest stick built model, a 13" span Piper Vagabond that he wound up and flew in circles around
the nearly empty restaurant. He's 92 years old, lives in Angola and has been building and flying
this kind of model all his life, all over the country. He's a regular at the annual Flying Aces
national meet in Geneseo. We phone pretty regularly and meet outdoors once in a while. He's built
5 or 6 new airplanes from scratch in the last 6 months, so I thought it was time to try one that I
had squirreled away. It's a 16" span Beech Staggerwing laser cut balsa kit. It's what's called a
"dimescale" model that's based on the kits made to sell for a dime back in the '30's and '40's and
aimed at 10 year old boys. What does that tell you? I've got a couple of fun evenings into this so
far. The old skills are still there, but I think tissue covering without warping everything will be
a challenge.
Keep modeling and stay safe. Send some pictures of what you are working on to Larry to share
with the rest of us.
Dick Schulenberg

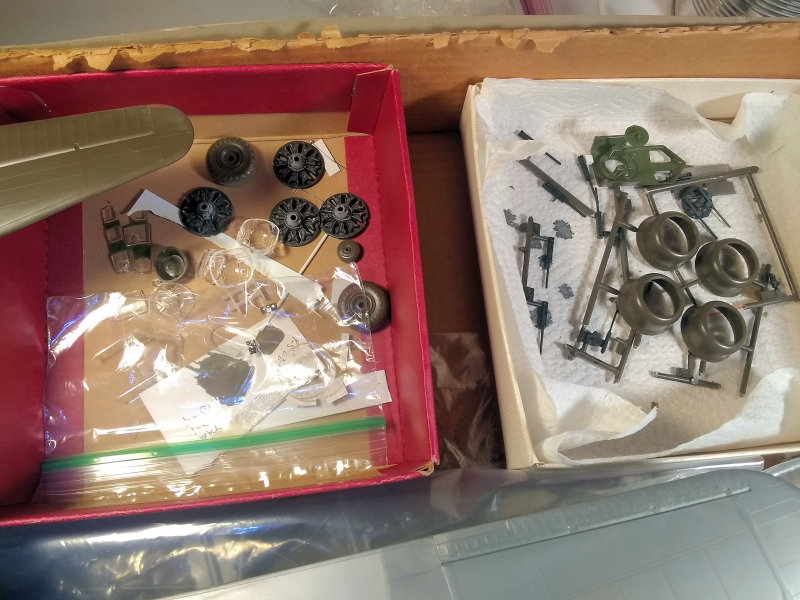
Club members' current projects:
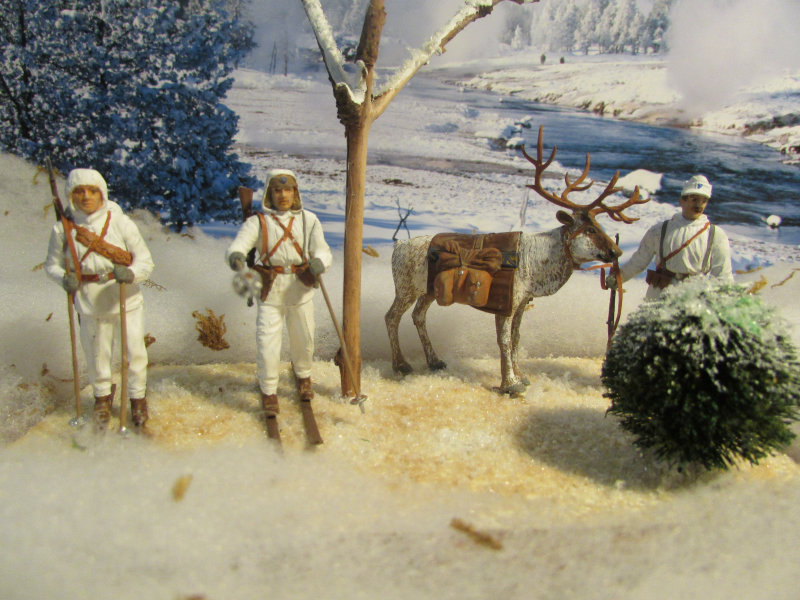
Dave Armitage sent some photos of his latest projects. His first model is a diorama of
Finnish ski troops with pack reindeer from winter war 1939; 1/35scale ICM.
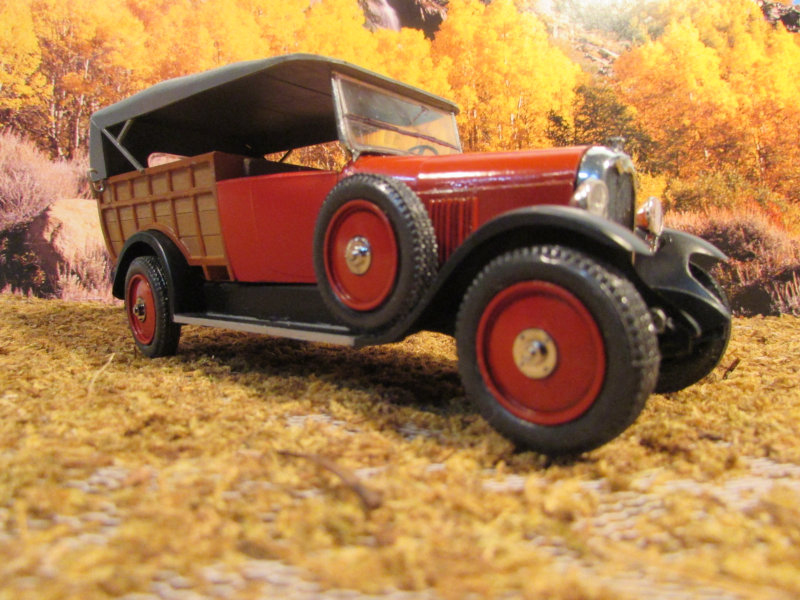
Dave's next model is a 1926 Citroen B-14 Normande. It was built from a 1/24 scale Heller
kit, and features an unusual body of a pickup truck with touring car top.
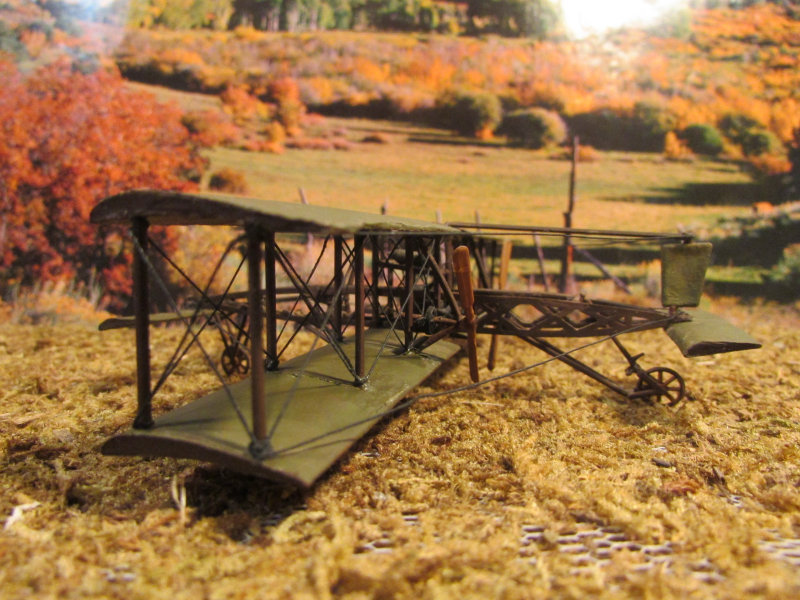
Dave also built a 1909 Avro triplane from a vintage Renwal aeroskin kit from the 1960's.
The approximate scale is 1/72.

Dave's next item is a 1909 DeHavilland #1, one of the first planes to fly in Britain.
It was also built from a Renwal kit.
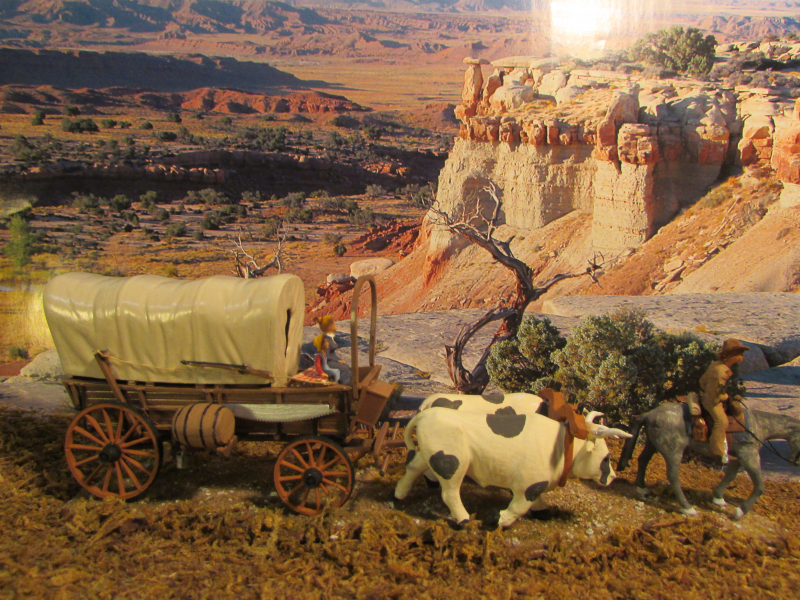
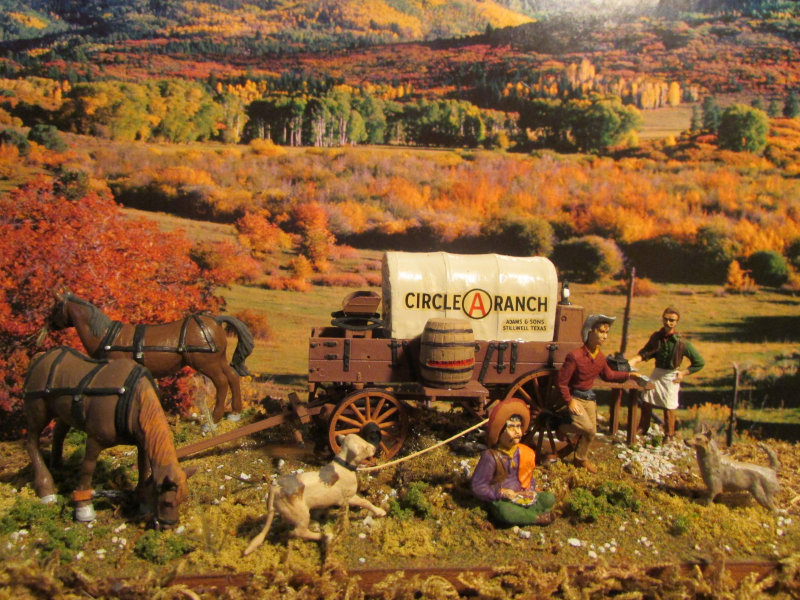
Dave's next model is an Ox-drawn covered wagon in 1/40 scale, built from a plastic kit by UPC,
vintage 1952.
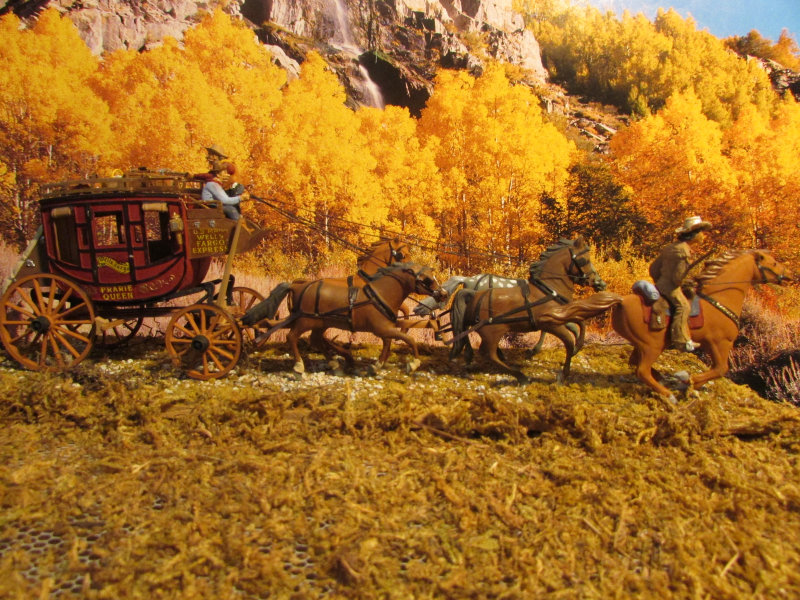
Dave also sent a photo of a Stage Coach, in the same scale and kit company.
Completing this series, Dave had a Chuck Wagon, also built from a UPC kit in 1/40 scale.
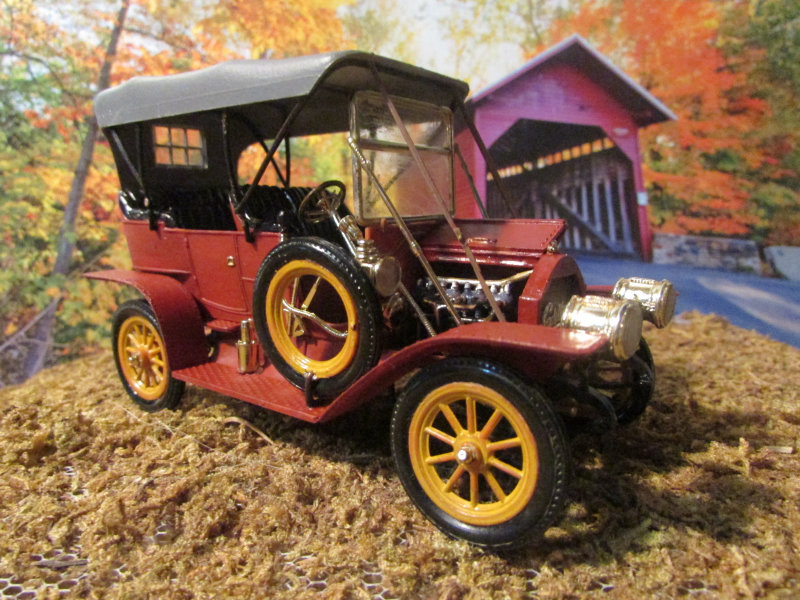
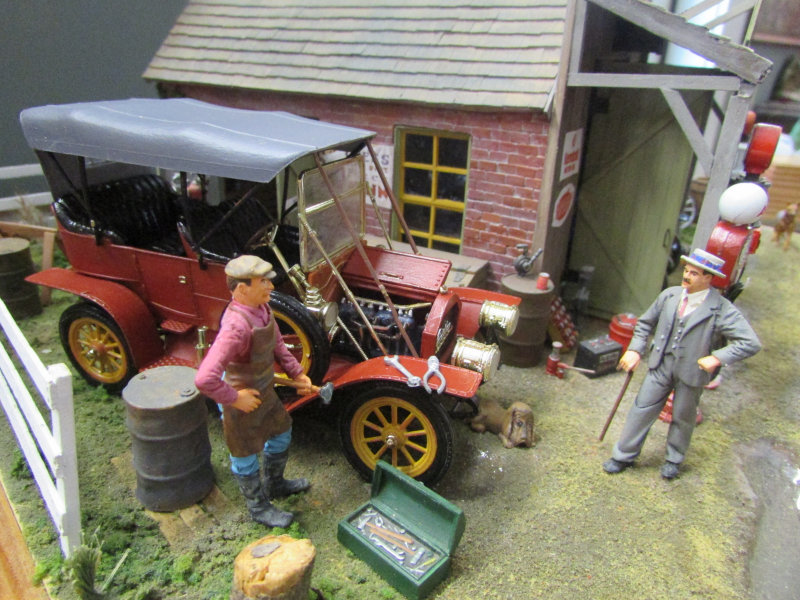
Dave's next model was a 1909 Cadillac Model 30 Tourer from a vintage Pyro plastic
kit of the 1960's. In the second picture, we see the Cadillac getting routine maintenance.
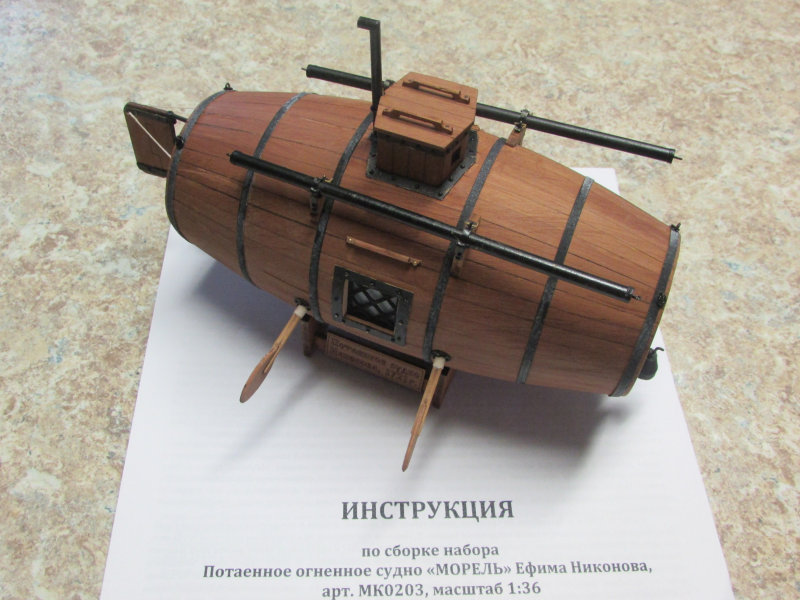
Dave's final model this month was a Russian kit of wood and brass in 1/36 scale. Dave said:
"This represents Russia's first underwater vessel, built in 1724 under the orders of Czar Peter
the Great. The kit was not an easy build. The vessel had a crew of 5, and was built and tested in
St. Petersburg. The tubes were designed to sink an enemy vessel by explosive or pyro-technic
material as the submerged vessel attacked the enemy. The pipe that looks like a periscope was
actually a tube to provide air to the crew. The kit was made in Russia with Russian directions.
I hope Iliya sees this."
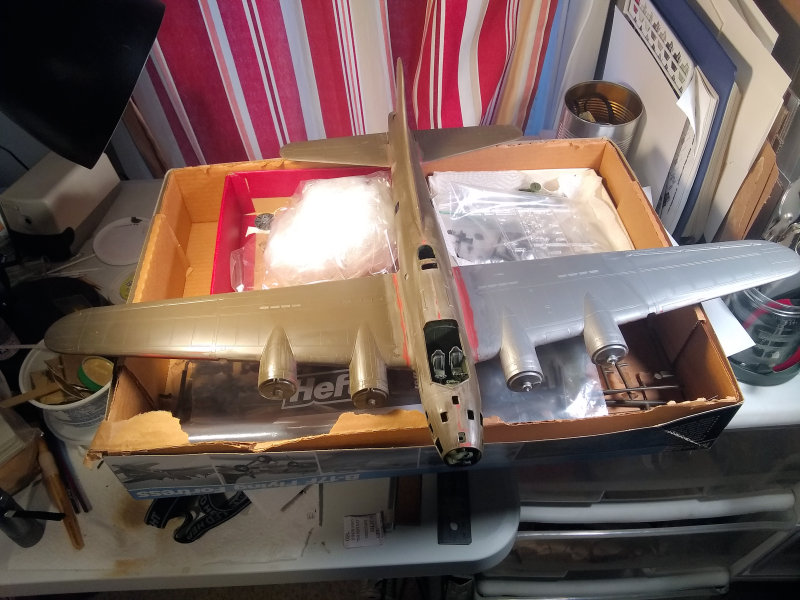
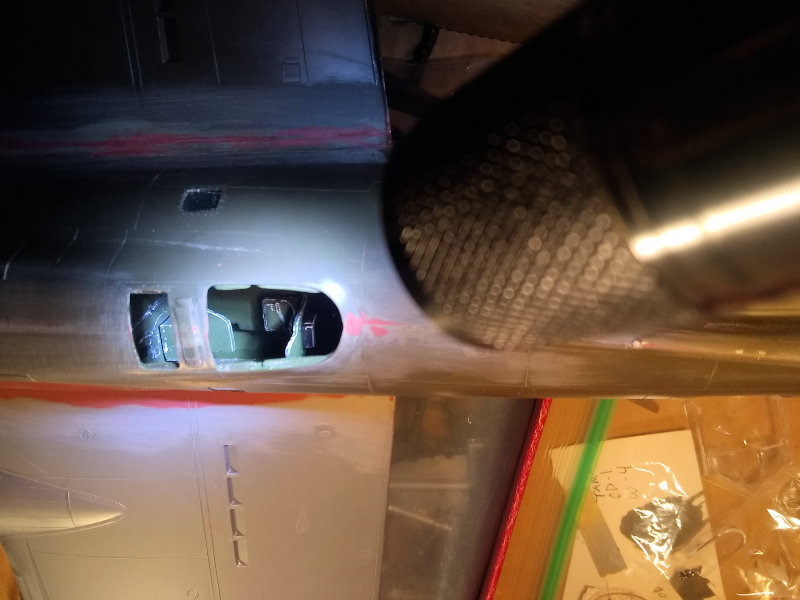
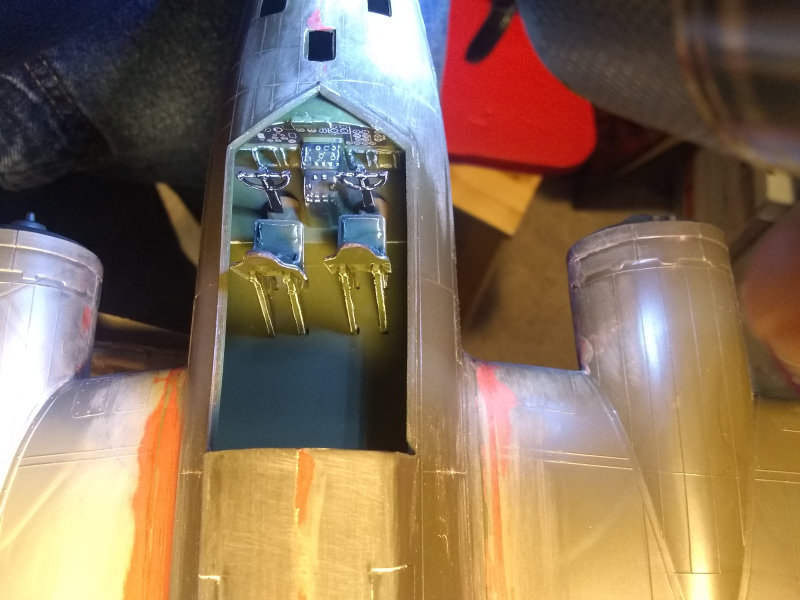
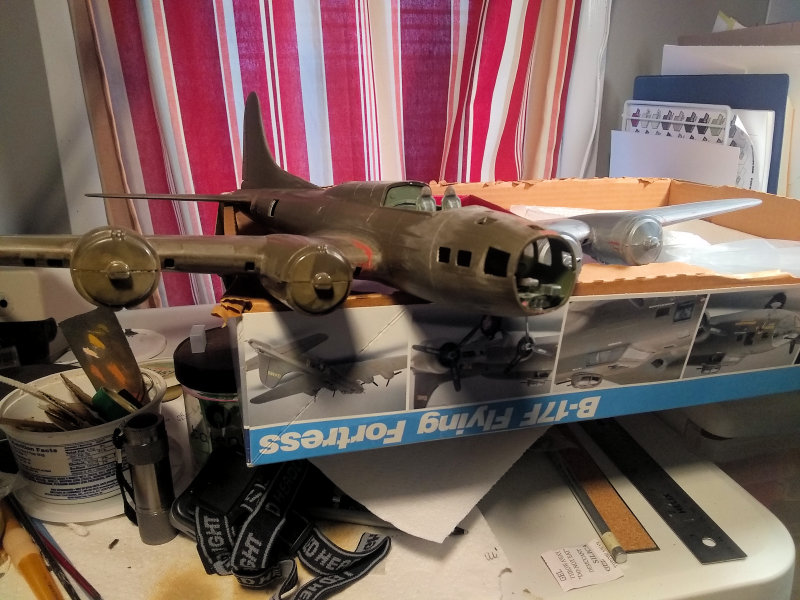
Steve Weller sent some photos of his current project, which he describes: "Well, here we go.
10 years on the shelf and we are bound by a sacred oath to finally finish this composite 1/48
Revell/Monogram B17E conversion. It has a Monogram wing because I trashed the Revell wing with
too much clamp pressure, and a Monogram radio compartment because I just didn't like all that
empty space right under a glass hatch. I'm going to use an E nose because it will be the only
part of a pricey Koster vacuform conversion that will ever get used. I hope to do an aircraft in
Hawaiian depot camo that won a broadside battle, like sailing, wooden men 'o war, with a Japanese
flying boat in the Solomons. Here goes year number 11."
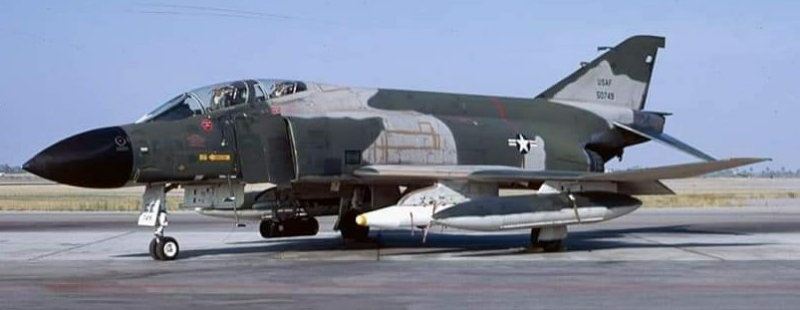
John Doerr provided a photo from his Air Force days. He said to "note the touch ups with
30219, straight from the can".
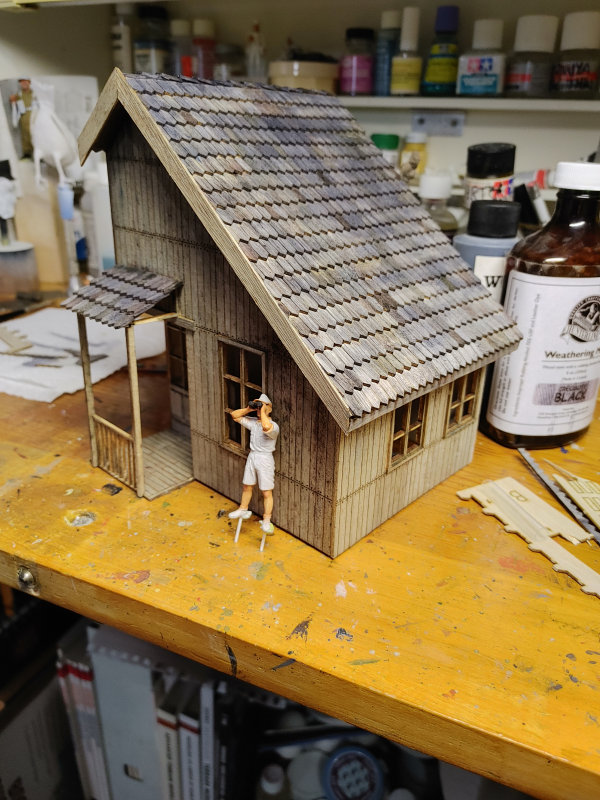
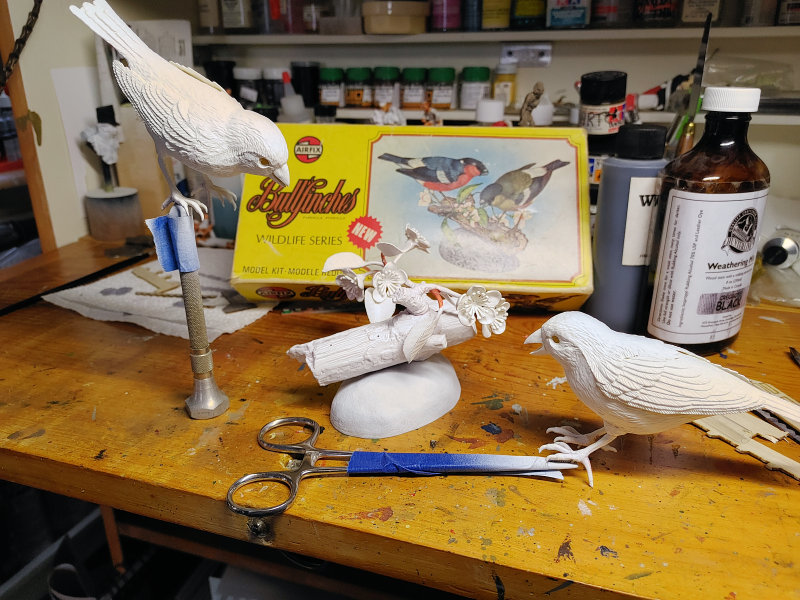
We received a missive from Jim Wolfe with the following comments: "Like the Phoenix of old,
Jim Wolfe rises from the ashes of obscurity with these burnt offerings:
A 1/35 laser-cut wooden home. It's a type of Balsa or Basswood, I'm guessing. Chi-Comm in
origin. Built up except for the foundation and windows and curtains. Started the weathering of
the wood, which was done with railroad modeler's weathering agents and also vinegar, which had
a ball of steel wool soaked in it. It will get paint over the top of it. An old airfix kit from
the 70s. Bulfinches, which I started as a gift for my mother. Primed and ready to start
finishing process. ISU - 152 - 2 by Dragon, also nearing finishing stage. Mostly out of box."
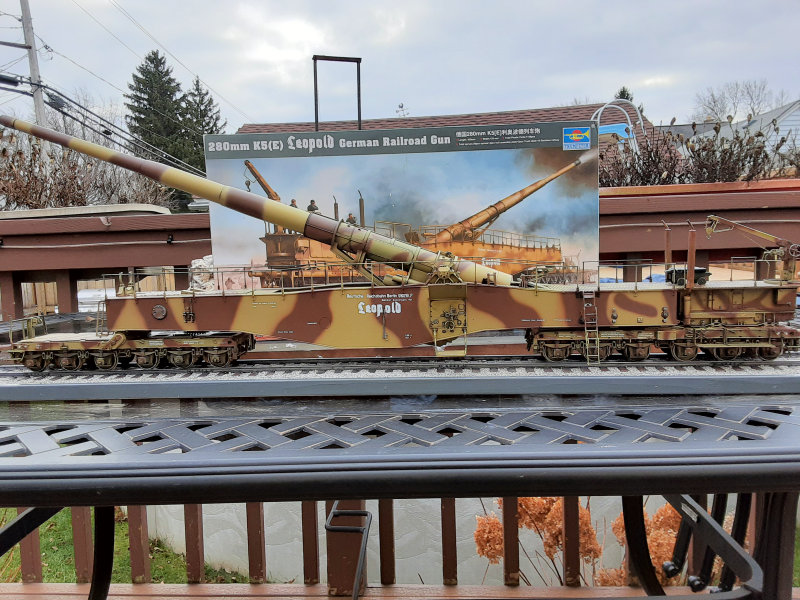
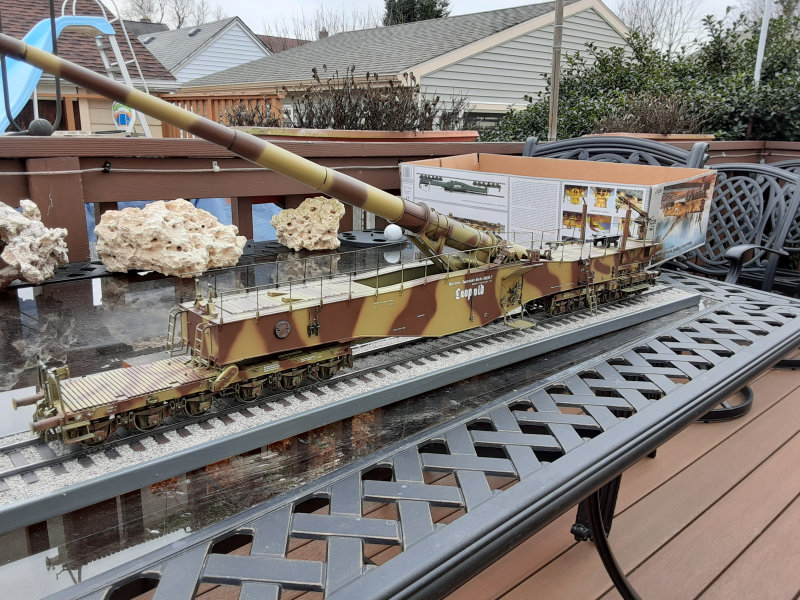
Eugene Paveljack sent a couple of photos of the Trumpeter Leopold that he's been working on.
That looks like a LARGE model.
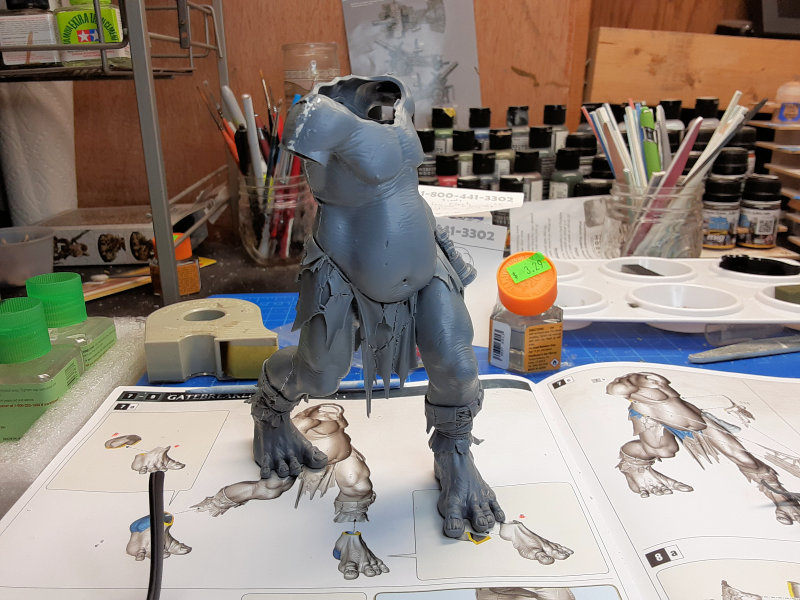
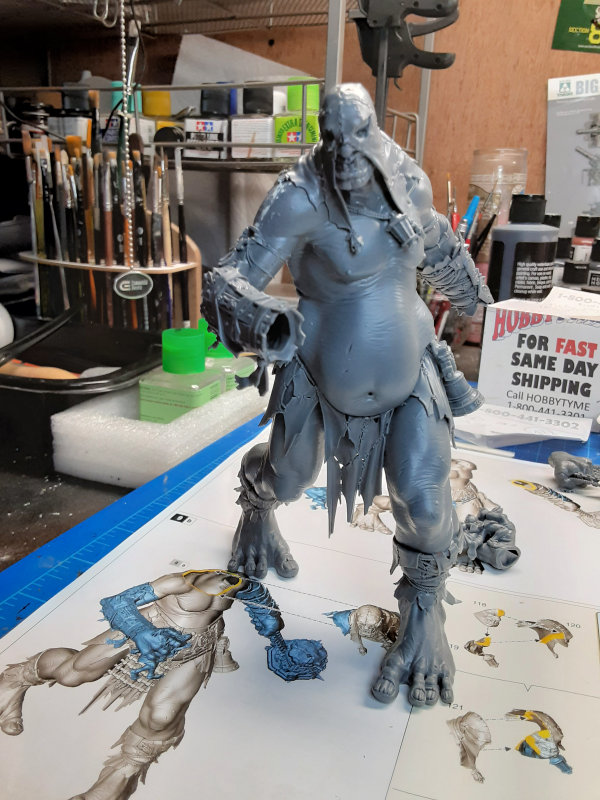
Eugene also sent some pics of a Warhammer figure he's currently making. He said he needed
a break from armor.
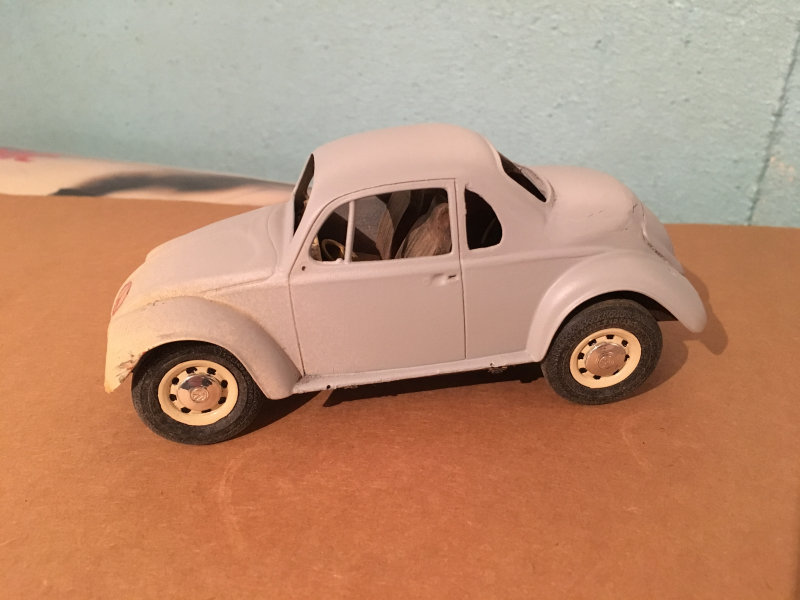
Al Germann provided an update on his activities on three models. Here's Al's description:
"VW Beetle Coupe? Sometimes I get some ideas I just have to try out. I had an old VW Beetle I
built up years ago but the current location was in my parts box. I thought this would be an
easy conversion and a plausible variation. I just cut out the roof section over the rear seats,
moved up the rear window and used the roof section to create the rear deck. I filled the gaps
with styrene and liquid cement. Then fill & sand (and repeat like old Revell kits). I cut the
rear quarter windows the same size and shape as the vent windows in the doors. Finishing it off
will be sometime in the future but wanted to get this far just to see how it would look and
very satisfied with the result."
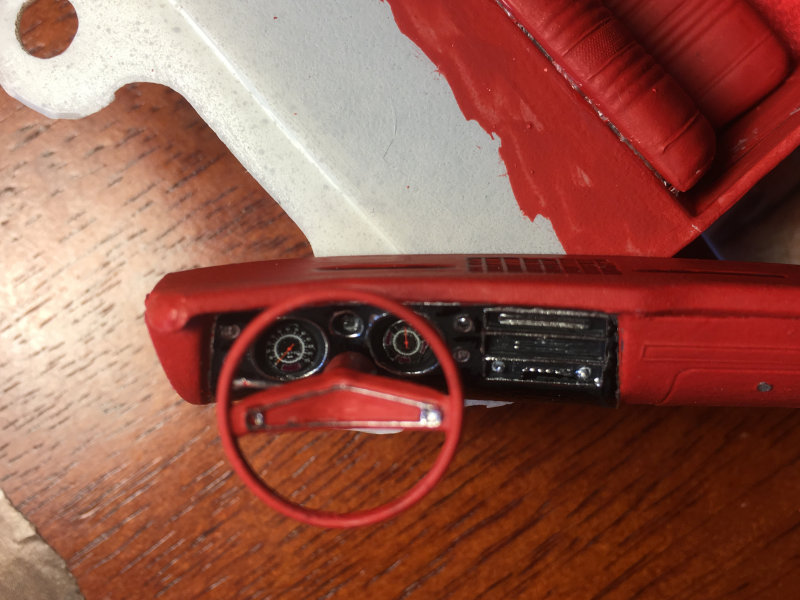
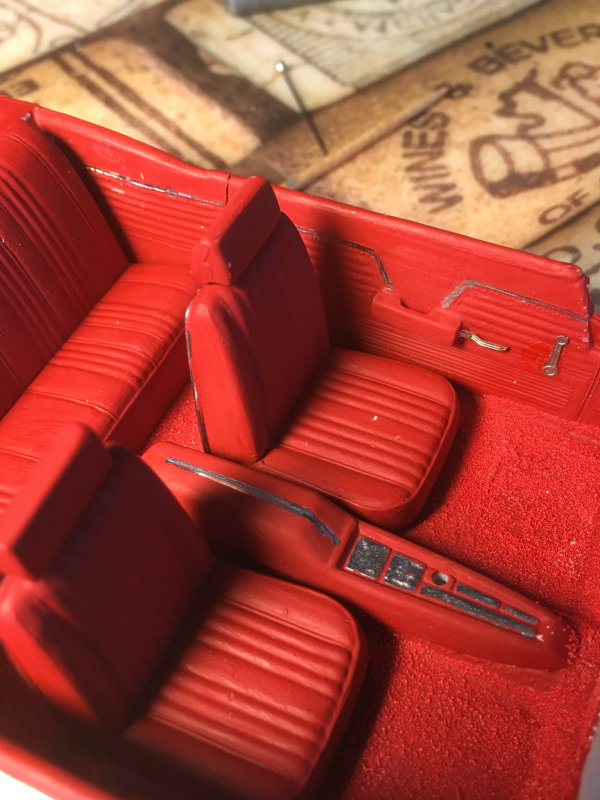
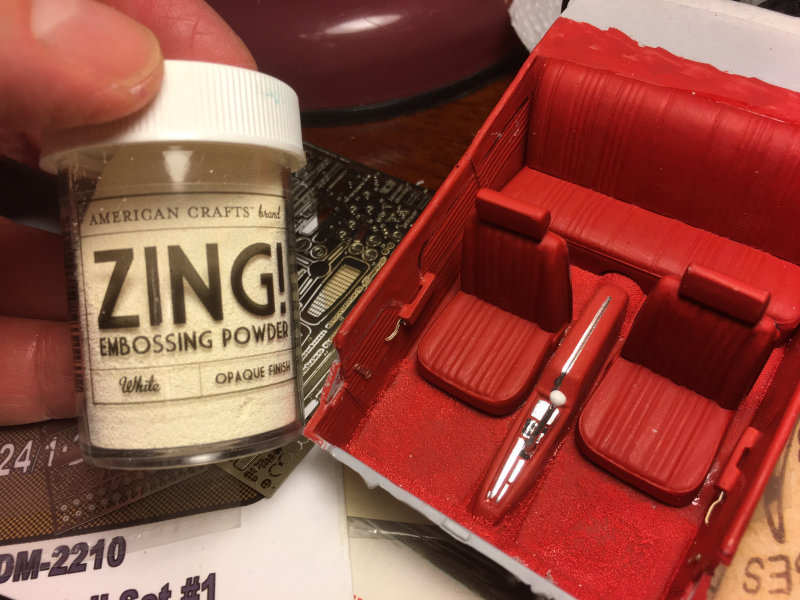
Al's second model: "The 1969 Chevelle has the body in paint, again. After last month's
newsletter, I thought I would improve the finish with a little more sanding & polishing. And
then went through the thickness of the paint pretty quick. After repainting and polishing, NOW
the body is done. Interior is done except for safety belts. Additional scratch building includes
turn signal, ignition, gas, arm rests, brake and clutch pedals. Used photo etch door handles and
window cranks. Carpeting is embossing powder (Hobby Lobby) painted the same as the rest of the
interior. Getting closer to the final assembly stage."
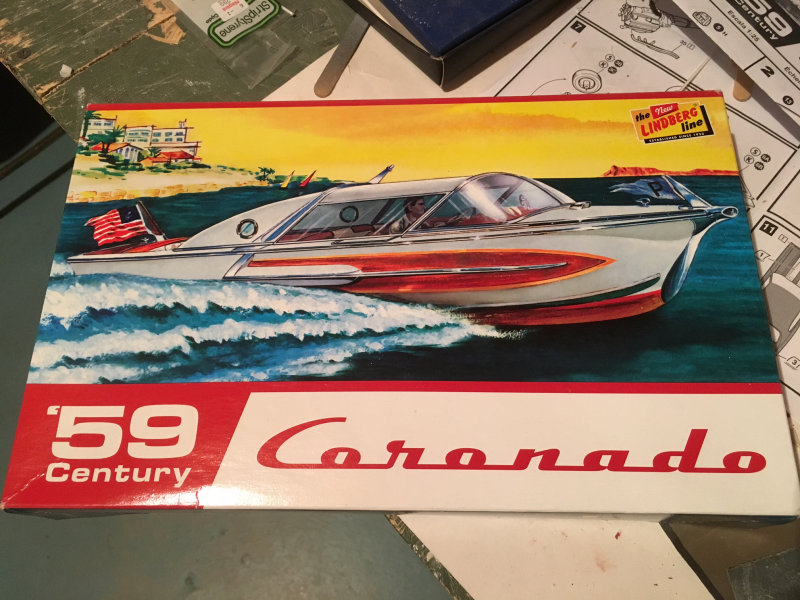
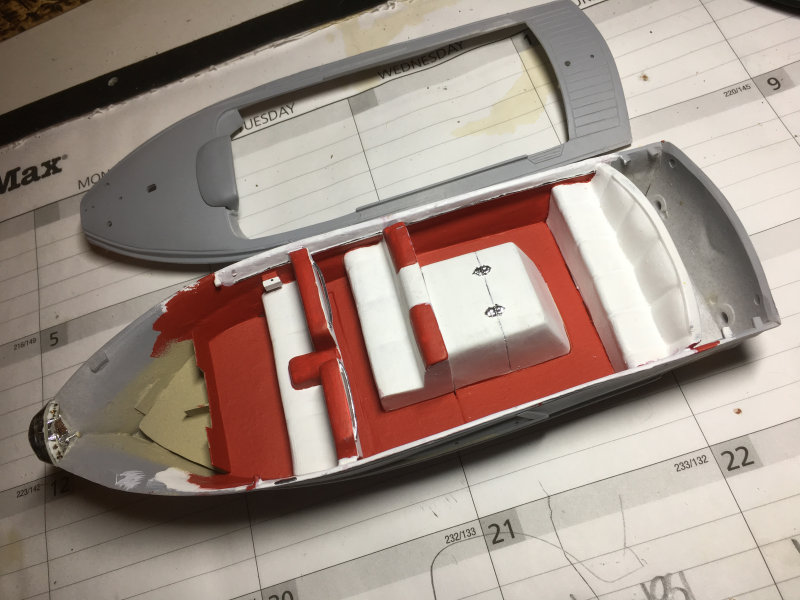
Al's third model: "Started a model kit my wife bought me a while back. It's a recent
reissue of an old Lindberg kit of a 1959 Century Coronado power boat in 1/25 scale. The
quality of the kit is all you can expect from that time period so I added a full floor,
bulkhead up near the bow and a chrome molding along the side walls. It is really a great
subject for a model! I used some Krylon suede texture paint for the floor texture. Planning
on having it in water tied to a dock. Should make an interesting diorama."
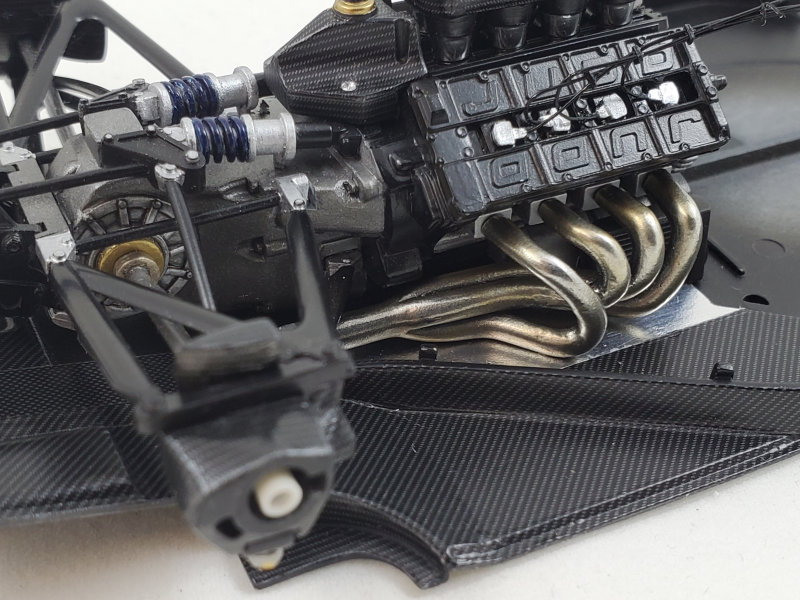
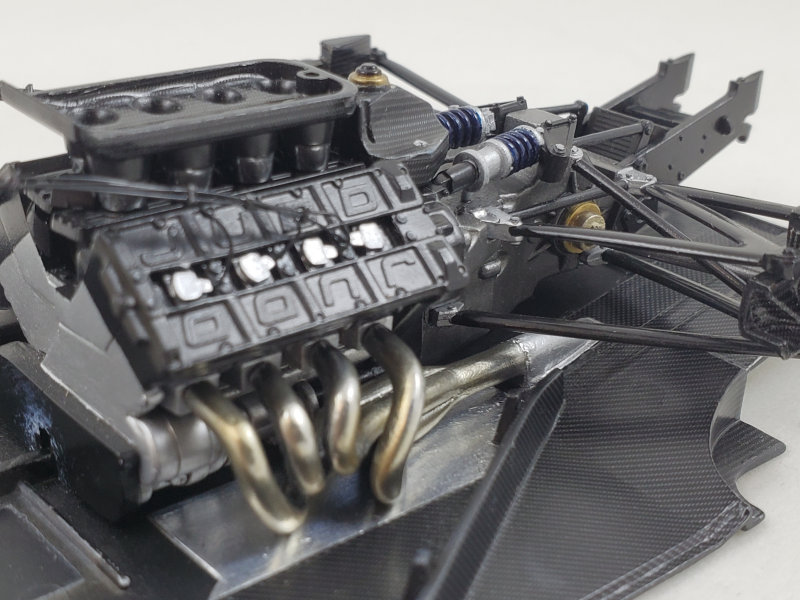
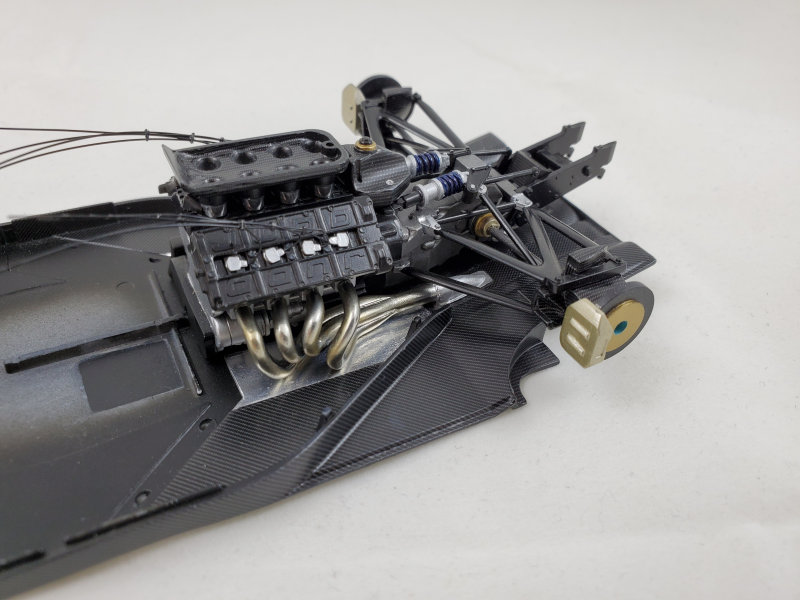
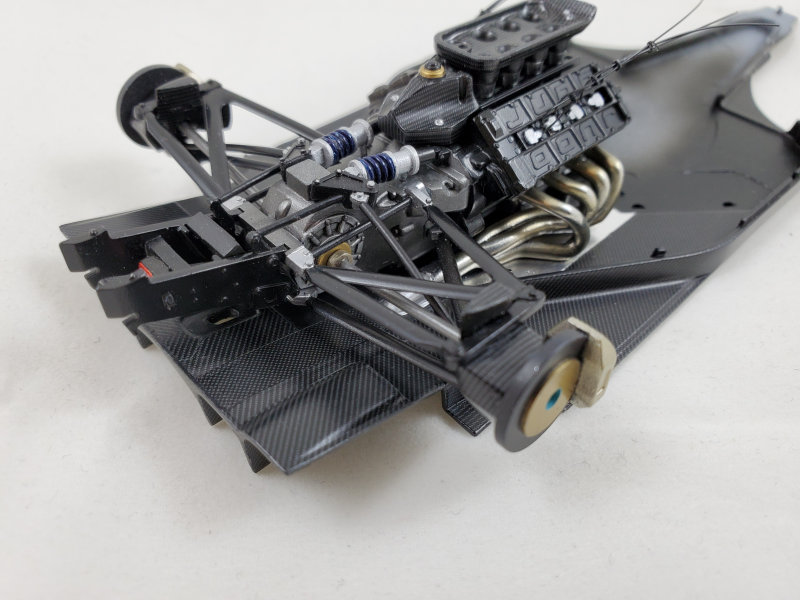
Larry Osolkowski had an update on his progress on the 1/20 Tamiya Leyton House F1 race car.
He applied several coats of clear to the tub, and started on the polishing process.
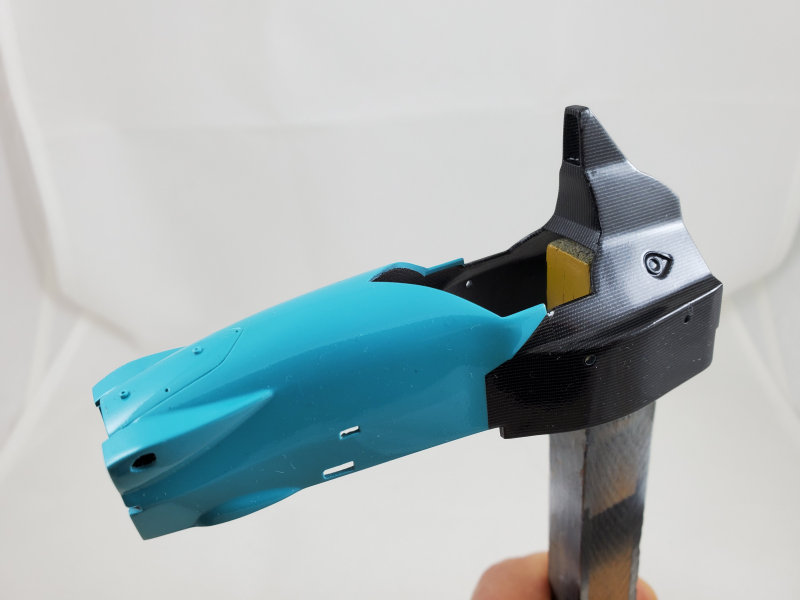
Larry also got the engine and rear suspension mounted to the floor, installed the exhaust
headers and applied some Tamiya burnt red weathering pastel to give them a more accurate look.
He then installed the rear brake discs.

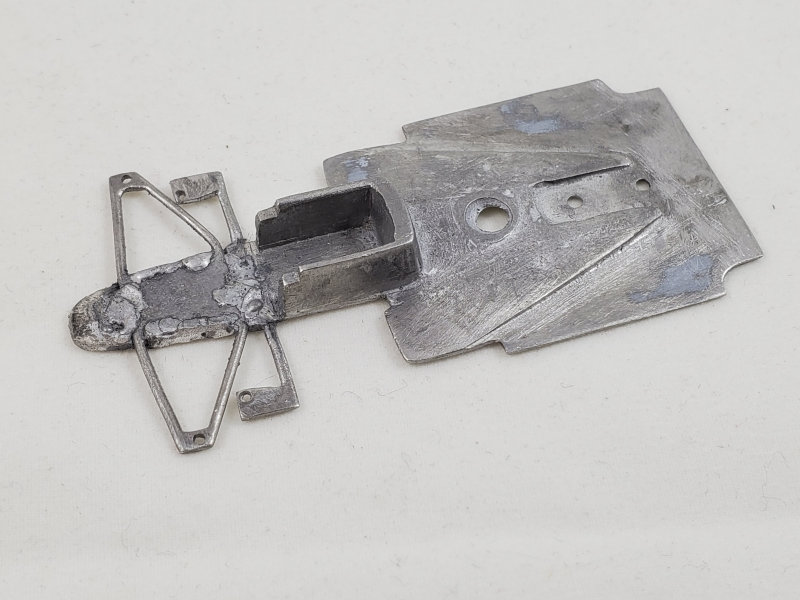
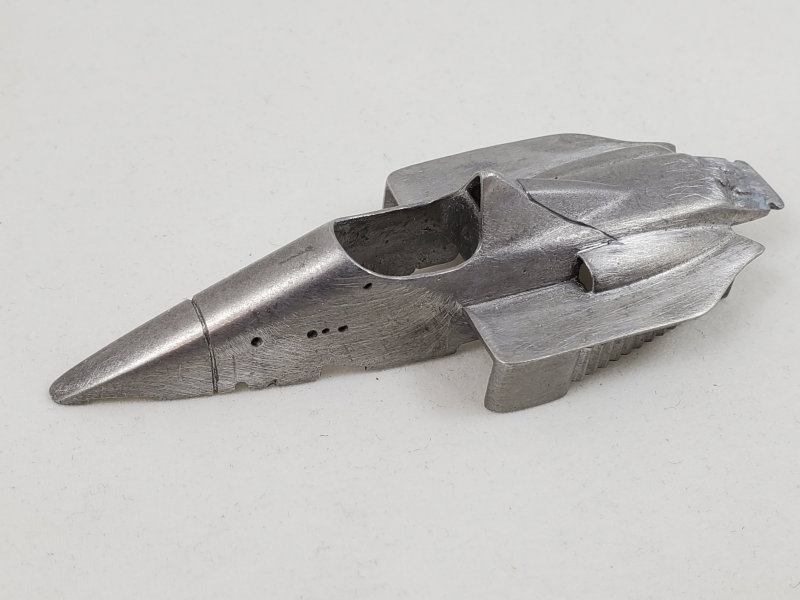
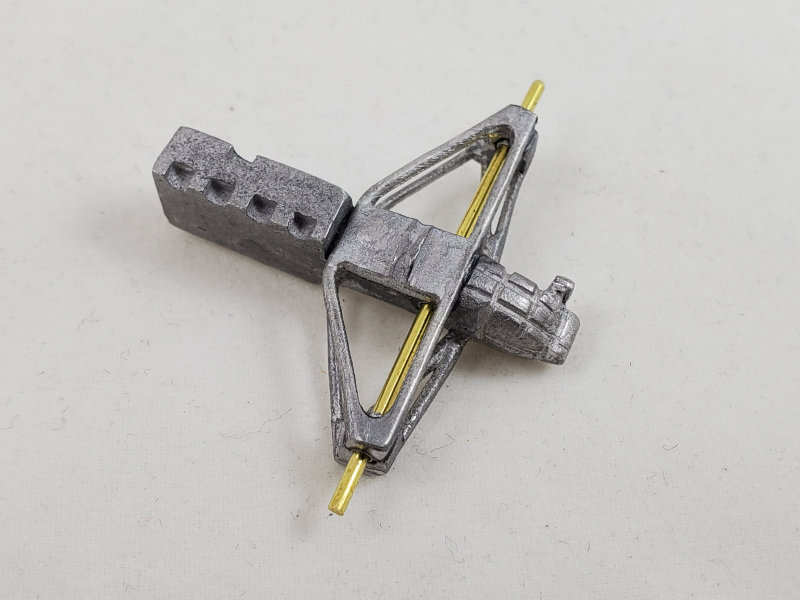
Larry also did some work on an old 1/43 Meri kit of a Benetton-BMW TG186 Formula 1 car from
the 1986 season. This is a pretty crude kit, with no photo etch and everything cast in white
metal. The fit leaves a lot to be desired, and the lower front suspension arms are on a plate
that required filing and soldering to get it located to the floor. The front uprights that mount
the front wheels required replacement axle stubs made from brass rod. All things considered,
it's coming together OK.
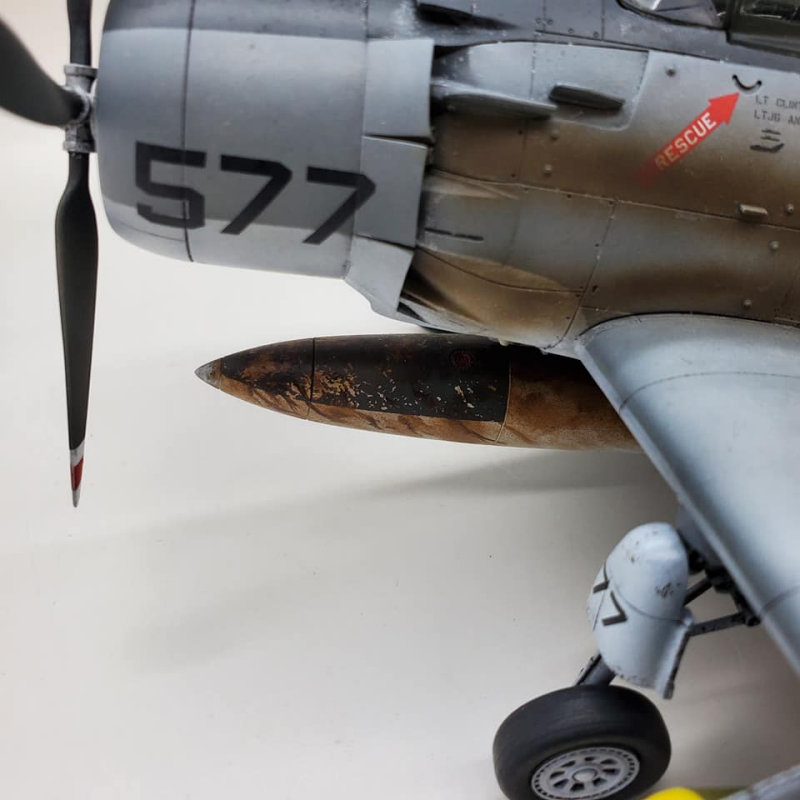
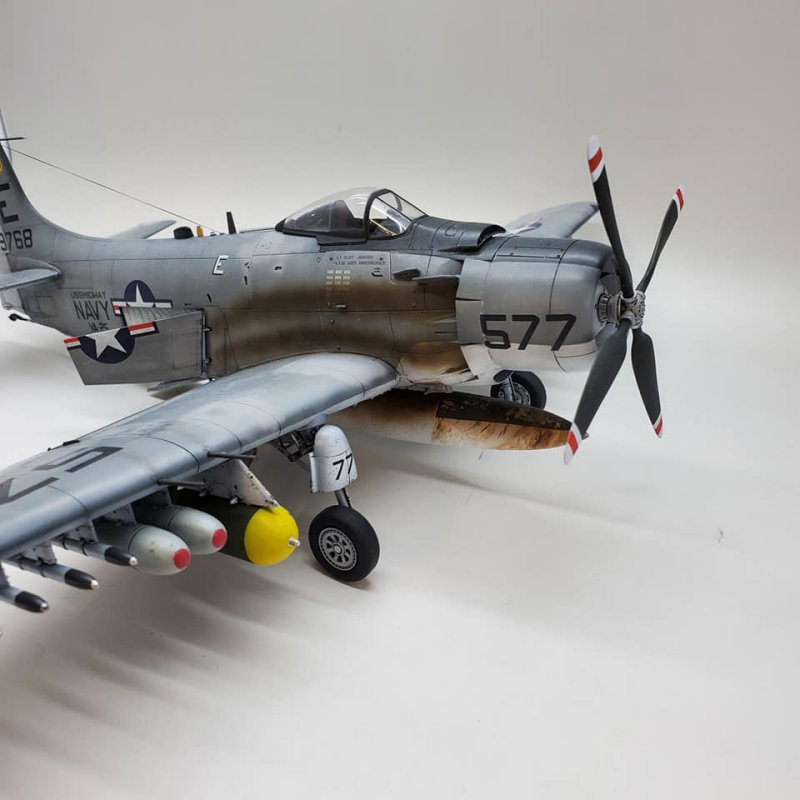
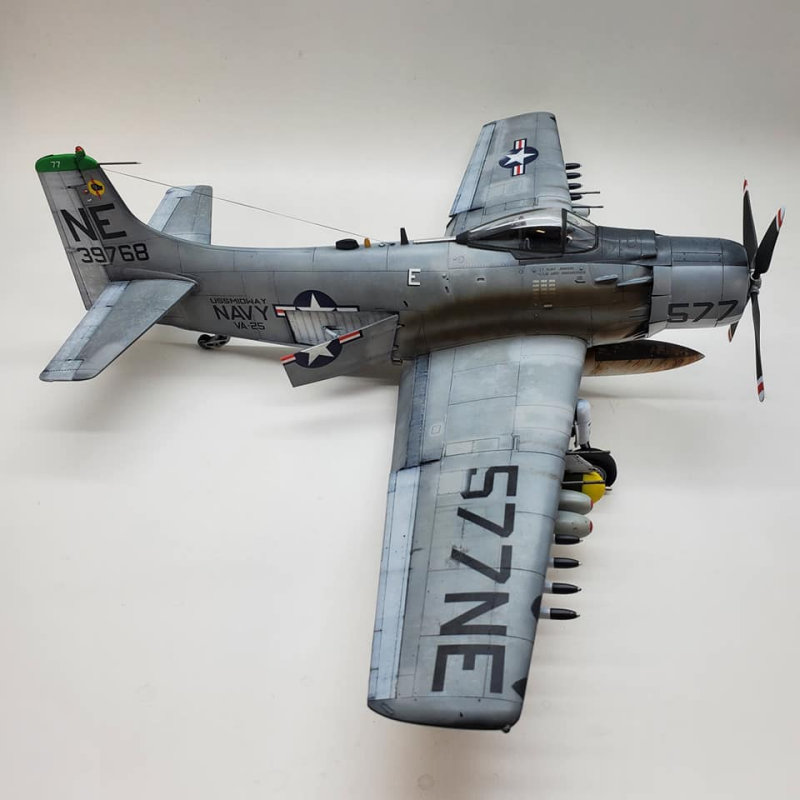
Here's what John Zaranek has been working on: "I finished my last build of 2020 - the Tamiya
1/48th scale US Navy A1-H Skyraider from VFA-25 squadron 'Fist Of The Fleet' as it flew off the USS
Midway during the Vietnam War. Assembly was straightforward and built out of the box with no
aftermarket accessories used. Primary paints used are from Tamiya sprayed through an Iwata HP-CS
airbrush. Detail paints are from Vallejo, Citadel, and Windsor and Newton. Overall weathering of
the airframe was accomplished by using table and sea salt crystals as a mask, with lightened and
darkened base colors lightly sprayed over it. Streaking and oil stains were made with artist's oil
paints. Exhaust staining on the sides of the fuselage were made with a highly thinned mix of Tamiya
NATO Black and Red Brown paint applied with the airbrush. I simulated paint chipping on the landing
gear with the sponge technique and dark grey acrylic paint. The kit is vintage 1998 and while the
colored decals released from the backing just fine, the black markings disintegrated in water. I
was able to source replacements from the aftermarket and they worked very well. All decals were
applied with Micro Sol and Set solutions. I wanted to portray a hard-working combat aircraft (but
not a garbage scow) and simulated paint repairs in random places along the fuselage and wings. I
used thinned base color paint and low pressure via the airbrush and sprayed it onto areas like
inspection covers and other areas of the airframe. This was a very satisfying build for me and I
am pleased that the different weathering techniques I tried for the first time turned out looking
pretty good."
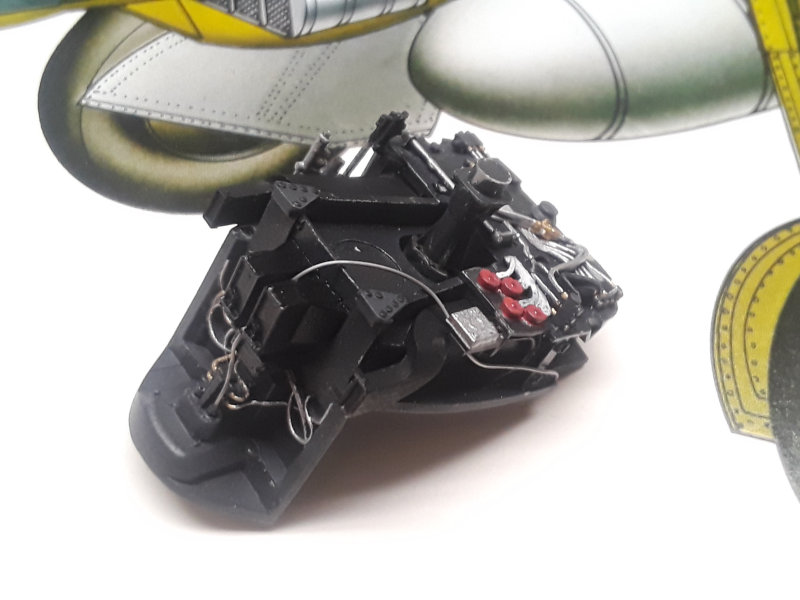
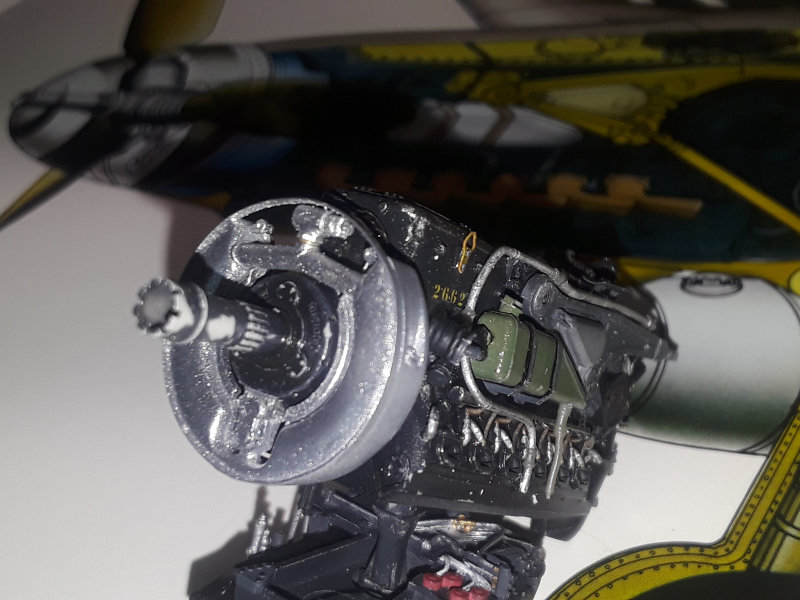
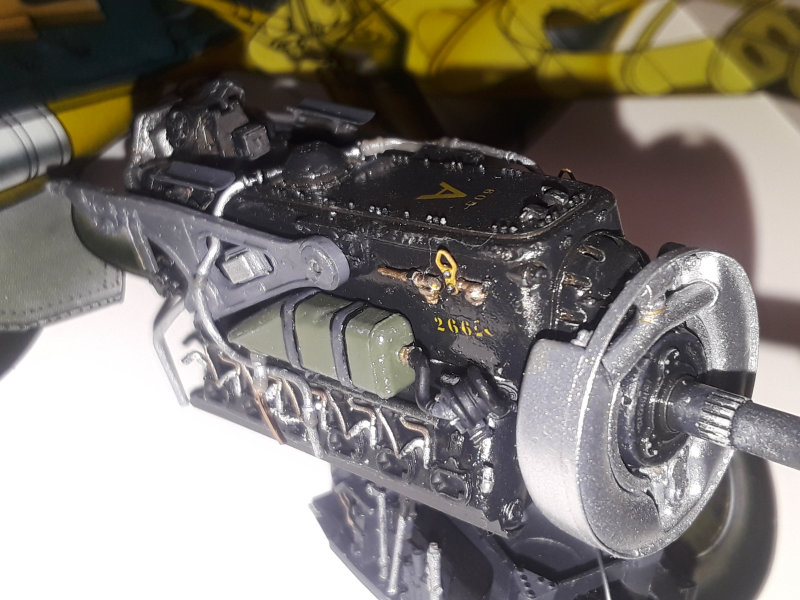
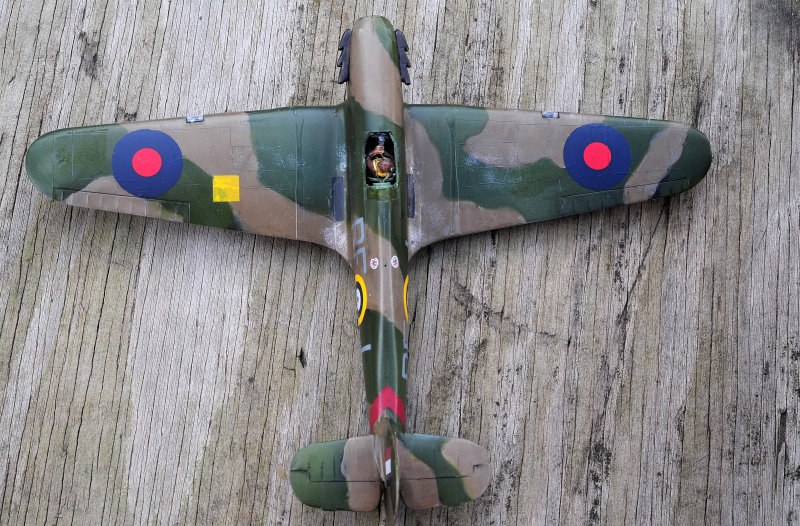
Clint Keidel sent along some photos of his latest project, a BF-109G. Clint said:
"It's an Eduard Big Ed detail set. Lots more to go, slow but steady. Hope everyone is
staying safe and modeling. Happy New Year to all."
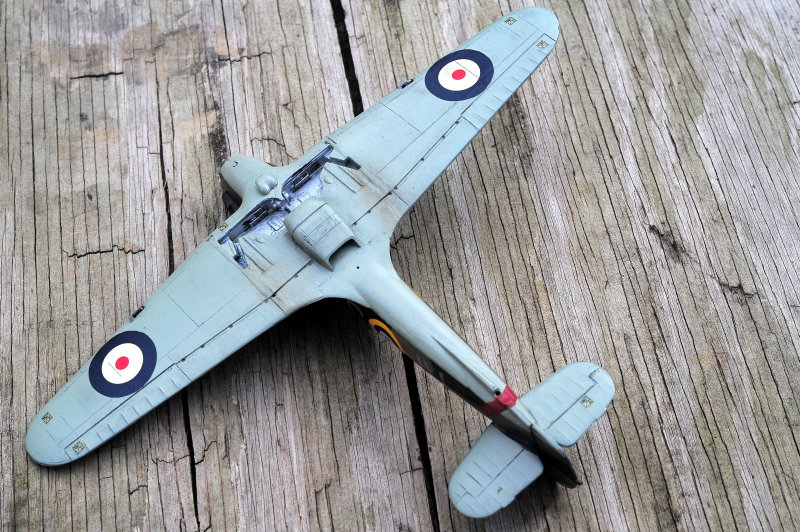
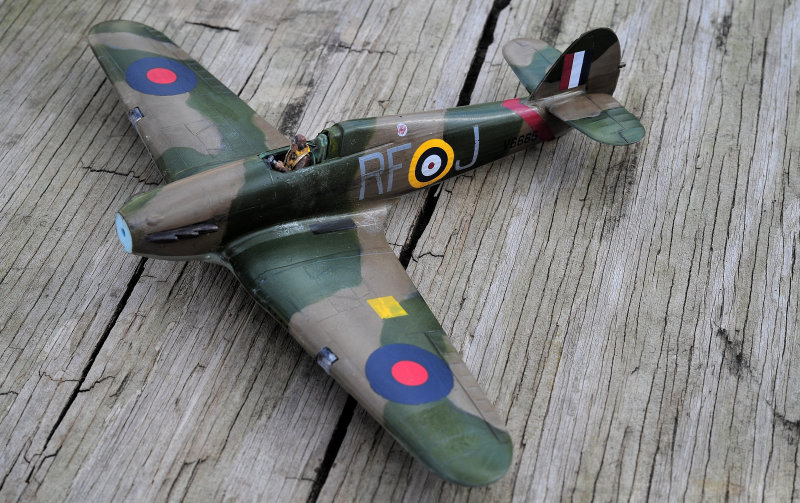
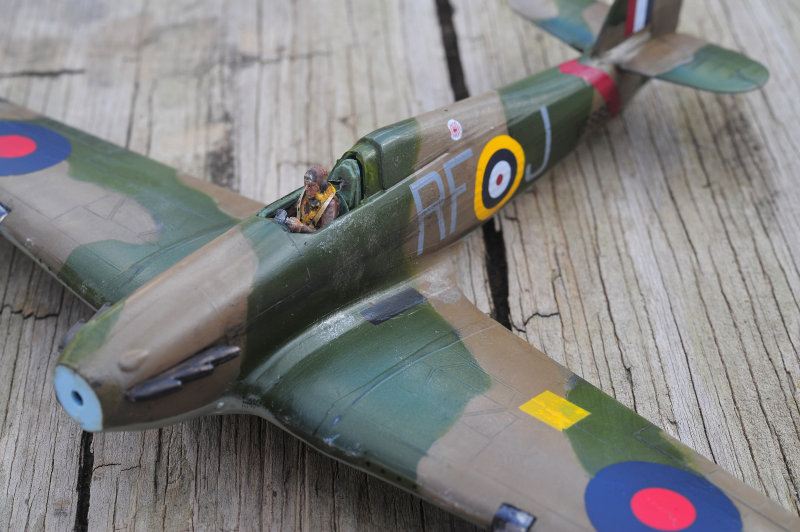
Jeff Belling sent in a report of his activities: "Been working on three things. First is
the old Airfix 1/48 Hurricane from the 70s. Light blue plastic, raised (mostly) panel lines,
and dodgy fit. The decals were old and too yellow so I used Techmod decals for 303 (Polish)
squad RAF. This A/C was flown by Flt. Lt. J.A. Kent. Very thin decals yet pretty opaque. But
they break apart if you're not really careful - and even if you are. Lots of painting where
the decals fractured. Still have weathering to do, install cockpit and gear."

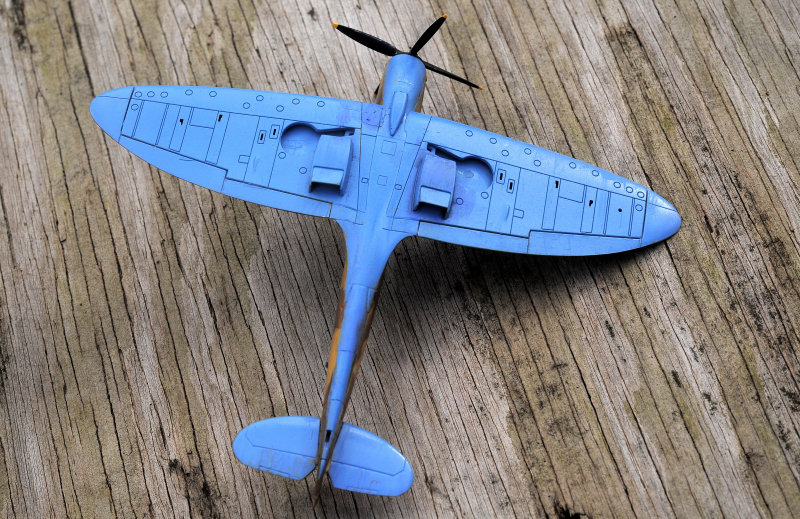
Jeff continues: "Second is a 1/72 Airfix Mk IX Spitfire. Future coated and now need to
apply decals, wash, weather. May make it in flight."

Jeff concludes: "Last one is an M-46 Pershing by Trumpeter, and has since been released by
another company. 1/72. Small details, wash and weather to add. After a lot of trouble with the
individual link plastic tracks I searched for a build review. Didn't find one, but found an
in-box review that said the "individual track links might be finicky." That's like saying
Attila the Hun might be unsocial."
Thanks to all of the members who sent in photos and updates on their current projects.
